Meade LX90-ACF 10 inch User Manual - Page 13
Getting Started
 |
View all Meade LX90-ACF 10 inch manuals
Add to My Manuals
Save this manual to your list of manuals |
Page 13 highlights
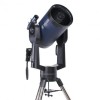
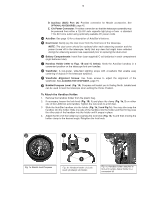
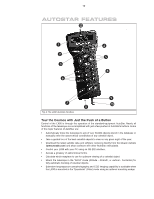
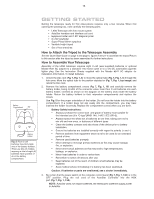
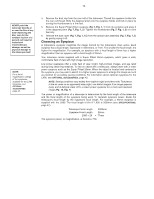
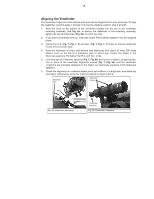
13 Fig. 5: Four C-cell batteries mounted inside one of the battery holders . There are two (2) holders, requiring a total of eight (8) batteries. Note position of rib in the battery compartment. GETTING STARTED Getting the telescope ready for first observations requires only a few minutes. When first opening the packing box, note carefully the following parts: • LX90 Telescope with fork mount system • AutoStar handbox and interface coil cord • Eyepiece holder and 1.25" diagonal prism • 8 x 50 Viewfinder • Super Plössl 26mm eyepiece • Variable height tripod • Set of hex wrenches How to Attach the Tripod to the Telescope Assembly See the Quick-Start Guide on page 4 and page 5, figures A thru H to assemble the tripod. Return to this section after the tripod as been assembled for further instructions. How to Assemble Your Telescope Assembly of the LX90 telescope requires eight C-cell (user-supplied) batteries or optional Meade #541 AC adapter to a standard 115v home outlet or to a 12v DC automobile cigarette lighter plug. See the Instruction Sheets supplied with the Meade #541 AC adapter for installation information. To install batteries: 1. Unlock the Dec. lock (Pg. 7, Fig. 1, 6) to move the optical tube (Pg. 7, Fig. 1, 5) through the fork arms. Move the optical tube to the position depicted in (Pg. 7, Fig. 1, top image) and relock the Dec. lock. 2. Remove the battery compartment covers (Pg. 7, Fig. 1, 16) and carefully remove the battery holder, being mindful of the connector wires. Insert four C-cell batteries into each battery holder, oriented as shown on the diagram on the battery slots inside the battery holder. Return the battery holders to their respective compartments and replace the covers. See Fig. 5 for the proper orientation of the holder. Do not force the holder into the battery compartment. If a holder does not slip easily into the compartment, you may have inserted the holder incorrectly. Replace the compartment covers when you are done. Battery Safety Instructions: • Always purchase the correct size and grade of battery most suitable for the intended use (8 x "C-type"[ANSI 14A, 14AC / IEC LR14]). • Always replace the whole set of batteries at one time, taking care not to mix old and new ones, or batteries of different types. • Clean the battery contacts and also those of the device prior to battery installation. • Ensure the batteries are installed correctly with regard to polarity (+ and -). • Remove batteries from equipment which is not to be used for an extended period of time. • Remove used batteries promptly. • Never attempt to recharge primary batteries as this may cause leakage, fire, or explosion. • Never short-circuit batteries as this may lead to high temperatures, leakage, or explosion. • Never heat batteries in order to revive them. • Remember to switch off devices after use. • Keep batteries out of the reach of children; small batteries may be ingested. • Seek medical advice immediately if a battery has been swallowed. Caution: If batteries or parts are swallowed, see a doctor immediately. 3. Be certain that the power switch on the computer control panel (Pg. 7, Fig. 1, 13C) is in the OFF position. Plug the coil cord of the AutoStar Controller into the HBX port (Pg. 7, Fig. 1, 13A). NOTE: AutoStar does not require batteries; the telescope's batteries supply power to AutoStar.
-
 1
1 -
2
-
3
-
4
-
5
-
6
-
7
-
 8
8 -
 9
9 -
 10
10 -
 11
11 -
 12
12 -
 13
13 -
 14
14 -
 15
15 -
 16
16 -
 17
17 -
 18
18 -
19
-
20
-
21
-
22
-
23
-
24
-
25
-
26
-
27
-
28
-
29
-
30
-
31
-
32
-
33
-
34
-
35
-
36
-
37
-
38
-
39
-
40
-
41
-
42
-
43
-
44
-
45
-
46
-
47
-
48
-
49
-
50
-
51
-
52
-
53
-
54
-
55
-
56
-
57
-
58
-
59
-
60
 |
 |
