Meade LX90-ACF 10 inch User Manual - Page 19
Easy Two-Star Align
 |
View all Meade LX90-ACF 10 inch manuals
Add to My Manuals
Save this manual to your list of manuals |
Page 19 highlights
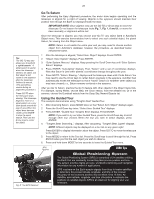
19 Important Tip: It is recommended that you train your telescope's drive the first time you align your telescope. Training the drive improves your telescope's pointing precision. For more information about training the drive, see page 55 for more information. IMPORTANT NOTE: While performing the automatic tracking, only use the Arrow keys to move the telescope. Once the telescope has been set in the Alt/Az home position, do not loosen the telescope locks (Fig. 1, 6 and 9), or move the base manually, or alignment will be lost. IMPORTANT NOTE: The "Telescope: Mount" option of the Setup menu is set to "Alt/Az" as the default alignment by the factory.The example presented in this section assumes that you are performing an alignment procedure for the first time with your telescope and therefore, the "Telescope: Mount" option does not need to be selected. For information on equatorial (Polar) alignment, see APPENDIX A," page 49. to start up the system. 4. "Press 0 to Align or Mode for Menu" displays. Press 0 to align your telescope using the "Easy Align" method, see "Easy (Two-Star) Align" on page 19. To skip the alignment process and access the AutoStar menus, press the Mode key. 5. The telescope then tests the motor function of the telescope by moving in the horizontal and vertical directions. 6. The next screen requests the status of Daylight Savings Time. If Daylight Savings Time is active, press the "1" key. If Daylight Savings Time is not active, press the "2" key. Note: Daylight Savings Time may be referred to by a different name in various areas of the world. 7. AutoStar then asks for the Telescope Model. Using the scroll keys (Pg. 10, Fig. 2, 7) on the AutoStar locate the model of your telescope and press enter. 8. System initialization is complete and the screen reads "Setup: Align" Easy (Two-Star) Align The fastest and easiest way to locate objects with Autostar's GO TO capabilities is to use Easy Align. Autostar automatically picks two stars from its database for the Easy Align procedure. During this procedure, Autostar slews the telescope to a first alignment star. The user is asked to verify that the telescope is pointed at the chosen star and then prompted to center the star in the eyepiece. The process is repeated with a second star to complete the alignment. NOTE: Before aligning the telescope, first verify that "INITIALIZING AUTOSTAR", page 18, has been performed. See "MOVING THROUGH AUTOSTAR'S MENUS", page 18, for a description of how Autostar's keys operate. How to perform the Easy Align Procedure If you have just applied power to Autostar, perform steps 1 through 5. If you have just performed the initialization procedure, go to step 6. 1. Turn the telescope on: Turn the telescope power switch to the ON position. The AutoStar beeps and the display screen is activated. AutoStar then takes a few moments to start up the system. 2. Select Alignment Procedure: "Press 0 to Align or Mode for Menu" displays. Press 0 to begin Easy (Two-Star) Alignment. To skip the alignment process and access the AutoStar menus, press the Mode key. Note: AutoStar initializes the Smart Drive if turned "On", the user has previously performed PEC training, and you have "parked" the telescope. If you have parked it, Autostar will remember its position on the worm gear. If you do not park the scope and turn it off, it will not remember its position. See PARK, page 28 and PEC TRAINING, page 53. 3. Testing Motors: The telescope then tests the motor function of the telescope by moving in the horizontal and vertical directions. 4. Daylight Savings Time: The next screen requests the status of Daylight Savings Time. If Daylight Savings Time is active, press the 1 key. If Daylight Savings Time is not active, press the 2 key. Note: Daylight Savings Time may be referred to by a different name in various areas of the world. 5. Telescope Model: AutoStar then asks for the Telescope Model. Using the scroll keys (Pg. 10, Fig. 2, 7) on the AutoStar locate the model of your telescope and press enter. 6. Setting the Home Position: "North Method: 1=True 2=Compass" displays. AutoStar is asking which Home Position method to use to setup the telescope. See page 18 "Setting the "Alt/Az" Home Position using Magnetic North" or Setting the "Alt/Az" Home Position using True North. The easiest way to set the telescope in the home position is using the Magnetic North method. Follow the steps on page 18 to set the home position. If using True North, press the "1" key, or press the "2" key to use Magnetic North. 7. With the telescope in the home position, press the "Enter" key. 8. Attempts a "GPS Fix": The GPS receiver attempts to acquire and sync up with signals from GPS satellite system. "Getting GPS Fix" displays. See THE GLOBAL POSITIONING SYSTEM on page 21. After performing these operations, AutoStar now knows the
-
 1
1 -
2
-
3
-
4
-
5
-
6
-
7
-
8
-
9
-
10
-
11
-
12
-
13
-
 14
14 -
 15
15 -
 16
16 -
 17
17 -
 18
18 -
 19
19 -
 20
20 -
 21
21 -
 22
22 -
 23
23 -
 24
24 -
25
-
26
-
27
-
28
-
29
-
30
-
31
-
32
-
33
-
34
-
35
-
36
-
37
-
38
-
39
-
40
-
41
-
42
-
43
-
44
-
45
-
46
-
47
-
48
-
49
-
50
-
51
-
52
-
53
-
54
-
55
-
56
-
57
-
58
-
59
-
60
 |
 |