Memorex 32022378 User Guide - Page 2
Use the Add/Remove Programs from within the Windows Control Panel. - drivers
 |
UPC - 034707023789
View all Memorex 32022378 manuals
Add to My Manuals
Save this manual to your list of manuals |
Page 2 highlights
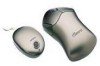
interference that may cause undesired operation. 1. Hardware Installation Installing a Mouse with Mouse Port (PS/2) Connector If you have a mouse with a round mouse port connector, you must turn off the computer before connecting or disconnecting your mouse. 2. Mouse Driver Installation for Windows 95/98/2000/ME & Windows NT 4.0 To install Mouse Driver for Windows 95/98/2000/NT/ME insert the floppy diskette into the floppy drive, click on the Start button, select Run, and type "A:\SETUP.EXE" (if you insert the Mouse Driver Disk in drive A.) or type "B:\SETUP.EXE" (if you insert the Mouse Driver Disk in drive B.) Follow the on-screen instructions. *Note- Before installing any software under Windows NT4.0 we recommend you create an Emergency Repair Disk using the Repair Disk Utility provided by the system. (RDISK.EXE) 3. Remove the Windows Mouse Driver (1) Click the "Uninstall" icon located in the mouse driver folder and follow the on-screen instructions Or Use the Add/Remove Programs from within the Windows Control Panel. (2) The "Uninstall" process will prompt you to change the Mouse Driver during the last step. If you do not change the Mouse Driver, the uninstallation will not remove the Mouse Driver to prevent your mouse from inactivation when you restart your computer. Follow the steps below to change the Mouse Driver before you restart your computer. Running Windows 95/98/2000/ME or NT 4.0 do the following: a) Select "Start". b) Select "Settings".
-
 1
1 -
 2
2 -
 3
3 -
 4
4 -
 5
5
 |
 |