Memorex MLT1522 User Guide - Page 19
Pc Setup Continued
 |
View all Memorex MLT1522 manuals
Add to My Manuals
Save this manual to your list of manuals |
Page 19 highlights
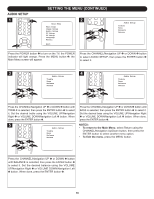
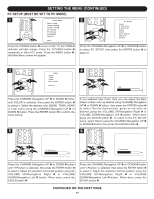
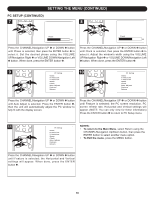
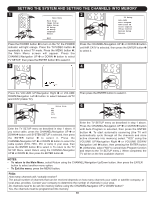
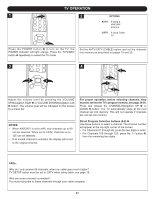
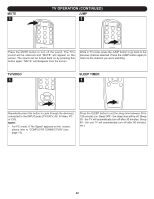
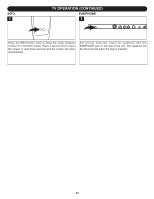
V Position SETTING THE MENU (CONTINUED) 50 PC SETUP (CONTINUED) 7 8 Phase 50 Clock 50 Press the CHANNEL/Navigation UP 1 or DOWN 2 button until Phase is selected, then press the ENTER button 5 to select it. Set the desired phase using the VOLUME UP/Navigation Right 3 or VOLUME DOWN/Navigation Left 4 button. When done, press the ENTER button 5. Press the CHANNEL/Navigation UP 1 or DOWN 2 button until Clock is selected, then press the ENTER button 5 to select it. Adjust the window's widthH :us00i.ng0KtHhze VOLUME UP/Navigation Right 3 or VOLUME VDO: W00.N/0NKHazvigation Left 4 button. When done, press the ENTER button 5. 9 PC Setup 10 PC Setup Color H Position V Position Phase Clock Auto Adjust Feature Return Color H Position V Position Phase Clock Auto Adjust Feature Return Press the CHANNEL/Navigation UP 1 orCoDloOr WN 2 button until Auto Adjust is selected. Press t6h50e0KENTER button 3, then the unit will automatically adju7s50t 0tKhe PC window to fully fit with the display screen. 9300K User Color Return Phase 50 Press the CHANNEL/Navigation UP 1 orCoDloOr WN 2 button until Feature is selected; the PC s6c5r0e0Ken resolution, PC screen refresh rate, Horizontal and75V00eKrtical settings will appear. (NOTE: You can only view 9Ufo3s0er0rKtChoelosre information) Press the ENTER button 3 to return tRoetPurCn Setup menu. 11 PC Setup Color H Position V Position Phase Clock Auto Adjust Feature Return H Position 50 Press the CHANNEL/Navigation UP 1 orCoDloOr WN 2 button until Feature is selected; the Hor6i5z0o0Kntal and Vertical settings will appear. When done7,50p0Kress the ENTER button 3. 9300K User Color Return NOTES: • To return to the Main Menu, select Return using the CHANNEL/Navigation Up/Down button, then press the ENTER button to select another menu option. • To Exit the menu, press the MENU button. H Position 50 V Position 50 V Position 50 18
-
 1
1 -
2
-
3
-
4
-
5
-
6
-
7
-
8
-
9
-
10
-
11
-
12
-
13
-
 14
14 -
 15
15 -
 16
16 -
 17
17 -
 18
18 -
 19
19 -
 20
20 -
 21
21 -
 22
22 -
 23
23 -
 24
24 -
25
-
26
-
27
-
28
-
29
-
30
-
31
-
32
-
33
-
34
 |
 |
