Memorex MVDP1077 User Guide - Page 18
Setup Menu
 |
View all Memorex MVDP1077 manuals
Add to My Manuals
Save this manual to your list of manuals |
Page 18 highlights
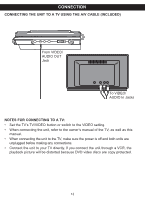
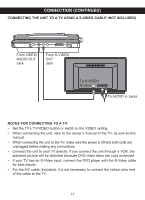
SETUP MENU The Setup menu lets you customize the DVD player by allowing you to select various language preferences, set video/audio settings, adjust what type of television screen you have and more. Use the following instructions to navigate and change the options as described on the upcoming pages. 1. Without a disc inserted and with the disc compartment cover closed, press the SETUP button 1 to enter the Setup menu. 2. Select one of the Setup icons at the top of the screen using the Navigation (√,®) buttons 2, then press the Navigation (†) button 2 to select it. 3. Use the Navigation (π,†) buttons 2 to select one of the Setup options, then press the SELECT button 3 to select it. 4. Use the Navigation (π,†) buttons 2 to change the desired setting, then press the SELECT button 3 to make the change. 5. Exit by pressing the SETUP button 1 again or select EXIT SETUP and press the SELECT button 3. POWER 1DISPLAY SETUP TFT SET VOLUME REPEAT 1/ALL MENU SUBTITLE 1 4 7 0 PLAY 2 5 8 +10 3 6 9 CLEAR STOP TITLE AUDIO 3 SELECT PAUSE/STEP SLOW F.B WD F.FWD PREV NEXT ANGLE ZOOM PROGRAM SEARCH 2 NOTE: • Slide the POWER switch (on the main unit) to turn the unit on; the ON/ STANDBY indicator will light green. When the unit is on, if you press the POWER ON/STANDBY button (on the remote), the unit will turn to the Standby mode; the ON/ STANDBY indicator will light red. To reduce the unit's power consumption, slide the POWER switch (on the main unit) to turn the unit off; the ON/STANDBY indicator will turn off. 17
-
 1
1 -
2
-
3
-
4
-
5
-
6
-
7
-
8
-
9
-
10
-
11
-
12
-
 13
13 -
 14
14 -
 15
15 -
 16
16 -
 17
17 -
 18
18 -
 19
19 -
 20
20 -
 21
21 -
 22
22 -
 23
23 -
24
-
25
-
26
-
27
-
28
-
29
-
30
-
31
-
32
-
33
-
34
-
35
-
36
-
37
-
38
-
39
-
40
-
41
 |
 |
