Miele T 8023 C Operating and Installation manual - Page 38
vertical or slightly angled. If installed, horizontal it will not operate
 |
View all Miele T 8023 C manuals
Add to My Manuals
Save this manual to your list of manuals |
Page 38 highlights
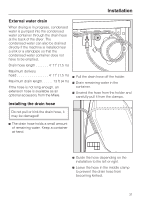
Installation 1 Connector 2 Sink connecting nut 3 Hose clamp 4 Hose end 5 Non-return valve 6 Dryer drain hose ^ Install the connector 1 with the sink connecting nut 2 to the sink standpipe. Usually the sink connection nut is equipped with a washer. Please remove the washer. ^ Plug the hose end 4 to the connector 1. ^ Using a screwdriver tighten the hose clamp 3 directly behind the sink connecting nut. ,Install the non-return valve 5 vertical or slightly angled. If installed horizontal it will not operate correctly. ^ Connect the non-return valve 5 to the dryer drain hose 6. See illustration for the correct direction. ^ Fasten the non-return valve with the hose clamps. 34
-
 1
1 -
2
-
3
-
4
-
5
-
6
-
7
-
8
-
9
-
10
-
11
-
12
-
13
-
14
-
15
-
16
-
17
-
18
-
19
-
20
-
21
-
22
-
23
-
24
-
25
-
26
-
27
-
28
-
29
-
30
-
31
-
32
-
 33
33 -
 34
34 -
 35
35 -
 36
36 -
 37
37 -
 38
38 -
 39
39 -
 40
40
 |
 |

1
Connector
2
Sink connecting nut
3
Hose clamp
4
Hose end
5
Non-return valve
6
Dryer drain hose
^
Install the connector
1
with the sink
connecting nut
2
to the sink
standpipe.
Usually the sink connection nut is
equipped with a washer. Please
remove the washer.
^
Plug the hose end
4
to the connector
1
.
^
Using a screwdriver tighten the hose
clamp
3
directly behind the sink
connecting nut.
,
Install the non-return valve
5
vertical or slightly angled. If installed
horizontal it will not operate
correctly.
^
Connect the non-return valve
5
to the
dryer drain hose
6
. See illustration for
the correct direction.
^
Fasten the non-return valve with the
hose clamps.
Installation
34