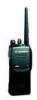
Motorola HT750 User Manual - Page 9
Getting Started, Battery Information, Charging the Battery - charger
 |
View all Motorola HT750 manuals
Add to My Manuals
Save this manual to your list of manuals |
Page 9 highlights
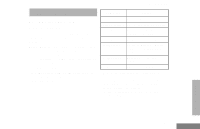
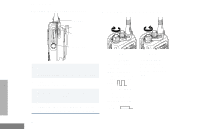
Getting Started GETTING STARTED BATTERY INFORMATION Charging the Battery If a battery is new, or its charge level is very low, you will need to charge it before you can use it. Note: Batteries are shipped uncharged from the factory. Always charge a new battery 14 to 16 hours before initial use, regardless of the status indicated by the charger. To charge the battery: Place the battery, with or without the radio, in the charger. The charger LED indicates the charging progress: LED color Status No LED Indication Battery inserted incorrectly. Single Green Flash Successful charger power-up. Flashing Red* Battery unchargeable or not making proper contact. Steady Red Battery in rapid-charge mode. Flashing Yellow Flashing Green† Battery in charger, not in rapidcharge mode but waiting to be charged. Battery 90% (or more) charged. Steady Green Battery fully charged. * Remove the battery from the charger and use a pencil eraser to clean the four metal contacts on the bottom of the battery. Place the battery back in the charger. If the LED indicator continues to flash red, replace the battery. † A standard battery may require one hour to charge to 90%. GETTING STARTED 9 English
-
 1
1 -
2
-
3
-
 4
4 -
 5
5 -
 6
6 -
 7
7 -
 8
8 -
 9
9 -
 10
10 -
 11
11 -
 12
12 -
 13
13 -
 14
14 -
15
-
16
-
17
-
18
-
19
-
20
-
21
-
22
-
23
-
24
-
25
-
26
-
27
-
28
-
29
-
30
-
31
-
32
-
33
-
34
-
35
-
36
-
37
 |
 |
