Motorola L704M User Guide - Page 8
Assembling the rubber band of, cordless handset Not applicable for, L70xM models, Setting - battery
 |
View all Motorola L704M manuals
Add to My Manuals
Save this manual to your list of manuals |
Page 8 highlights
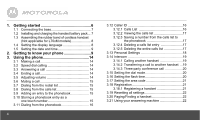
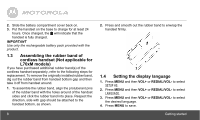
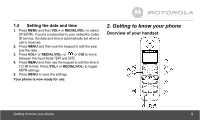
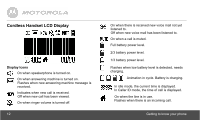
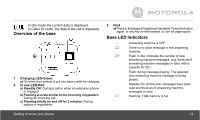
2. Slide the battery compartment cover back on. 3. Put the handset on the base to charge for at least 24 hours. Once charged, the will indicate that the handset is fully charged. IMPORTANT Use only the rechargeable battery pack provided with the product. 1.3 Assembling the rubber band of cordless handset (Not applicable for L70xM models) If you have purchased additional rubber band(s) of the cordless handset separately, refer to the following steps for replacement. To remove the originally installed rubber band, dig out the rubber band from handset bottom gap and then take it off from handset around. 1. To assemble the rubber band, align the protuberant pins of the rubber band with the holes around of the handset sides and click the rubber band into place. Respect the direction, side with gap should be attached to the handset bottom, as shown. 8 2. Press and smooth out the rubber band to enwrap the handset firmly. 1.4 Setting the display language 1. Press MENU and then VOL+ or REDIAL/VOL- to select SETUP HS. 2. Press MENU and then VOL+ or REDIAL/VOL- to select LANGUAGE. 3. Press MENU and then VOL+ or REDIAL/VOL- to select the desired language. 4. Press MENU to save. Getting started
-
 1
1 -
2
-
 3
3 -
 4
4 -
 5
5 -
 6
6 -
 7
7 -
 8
8 -
 9
9 -
 10
10 -
 11
11 -
 12
12 -
 13
13 -
14
-
15
-
16
-
17
-
18
-
19
-
20
-
21
-
22
-
23
-
24
-
25
-
26
-
27
-
28
-
29
-
30
-
31
-
32
-
33
-
34
-
35
-
36
-
37
-
38
 |
 |