Motorola T605 Installation Manual - Page 4
English - bluetooth car kit
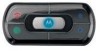 |
UPC - 723755987999
View all Motorola T605 manuals
Add to My Manuals
Save this manual to your list of manuals |
Page 4 highlights
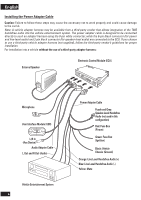
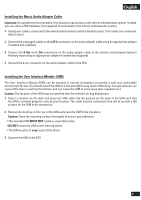
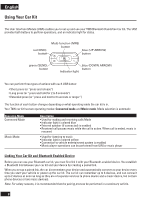
English Guidelines for Installation and Connection • Only qualified personnel should install this car kit. Because of the wide variety of vehicle types and models it may be necessary to contact the vehicle manufacturer for detailed installation information. If needed, contact the vehicle manufacturer for air bag information specific to the vehicle. Caution: An air bag inflates with great force. DO NOT place objects, including communication equipment, in the area over the air bag or in the air bag deployment area. If the communication equipment is improperly installed and the air bag inflates, serious injury could occur. • Mount components securely on strong surfaces to prevent shifting that could cause injury or interfere with safe vehicle operation. Always use the supplied mounting hardware. • Mounted components and attached wires or cables must not interfere with seating or leg space. • Route cables so they are protected from pinching, sharp edges and crushing. Keep all in-line connectors easily accessible. • The car kit is intended for use in 12 Volt negative ground systems only. The car kit draws less than 3 Amps. Confirm that the vehicle's electrical system can supply this current. • The installation steps are in no particular order. In general, you should first pick the locations where you will be mounting the UIM, microphone, speaker, and ECU. Mount the UIM, speaker and microphone and route the cables to the ECU mounting location. Install the power adaptor cable. Plug everything into the ECU, and then mount the ECU. The car kit has separate output paths for the handsfree audio (line and speaker levels) and music (RCA line-level output). Both handsfree and music audio paths need to be connected for full system operation. Installing the Handsfree Car Kit Caution: This car kit must be connected to a maximum 5 Amp fuse in the car fuse panel to prevent fire or other damages should a short circuit occur in the ECU. Before installation, unpack, assemble, and test all components on a service bench. Installing the Electronic Control Module (ECU) Mount the ECU securely. The best location for the ECU is under the dash. The box must be protected from dirt and moisture, have adequate space for cooling, and allow for cable connections. Barcode Mounting Surface Mounting Surface Barcode For optimal Bluetooth performance, mount the ECU so that the side with the barcode faces away from the mounting surface. The ECU can be oriented in any direction. Do not place it behind or within large areas of metal. Caution: The location must not interfere with the vehicle's air bag. 3
-
 1
1 -
 2
2 -
 3
3 -
 4
4 -
 5
5 -
 6
6 -
 7
7 -
 8
8 -
 9
9 -
 10
10 -
11
-
12
-
13
-
14
-
15
-
16
-
17
-
18
 |
 |