NEC LCD4610-BK MultiSync LCD4010/4610 Users Manual - Page 31
Ir Control, Tile Matrix, Heat Status, Power On Delay, Date & Time, Schedule, Advanced, Option
 |
UPC - 805736012231
View all NEC LCD4610-BK manuals
Add to My Manuals
Save this manual to your list of manuals |
Page 31 highlights
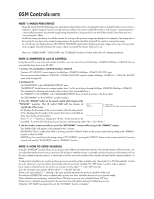
OSM Controls-Advanced option English IR CONTROL TILE MATRIX HEAT STATUS POWER ON DELAY ADVANCED OPTION MONITOR ID IR CONTROL TILE MATRIX HEAT STATUS POWER ON DELAY DATE & TIME SCHEDULE ADVANCED OPTION RESET :SEL SET :NEXT EXIT :RETURN MENU :EXIT MENU ADVANCED OPTION MONITOR ID IR CONTROL TILE MATRIX HEAT STATUS POWER ON DELAY DATE & TIME SCHEDULE ADVANCED OPTION RESET :SEL SET :NEXT EXIT :RETURN MENU :EXIT MENU ADVANCED OPTION MONITOR ID IR CONTROL TILE MATRIX HEAT STATUS POWER ON DELAY DATE & TIME SCHEDULE ADVANCED OPTION RESET :SEL SET :NEXT EXIT :RETURN MENU :EXIT MENU ADVANCED OPTION MONITOR ID IR CONTROL TILE MATRIX HEAT STATUS POWER ON DELAY DATE & TIME SCHEDULE ADVANCED OPTION RESET :SEL SET :NEXT EXIT :RETURN MENU :EXIT MENU IR CONTROL NORMAL PRIMARY SECONDARY LOCK :SEL SET :SET EXIT :RETURN MENU :EXIT MENU TILE MATRIX H MONITORS V MONITORS POSITION TILE COMP ENABLE :SEL + -: ADJ 1 1 1 YES / NO YES / NO EXIT :RETURN MENU :EXIT MENU Selects the infra-red wireless remote controllers mode with using the RS-232C daisy chain. The item in this menu will become effective by pressing "SET" button on the selected item. NORMAL: The monitor will be controlled normally by wireless remote controller. PRIMARY: Set "PRIMARY" at the head of the daisy chained monitors by RS-232C. SECONDARY: Set "SECONDARY" after 2nd daisy chained monitor. LOCK: Disable the monitor control by infra-red wireless remote controller. Keep pressing "DISPLAY" button for 5 or more seconds, this setting will return to "NORMAL". See "NOTE 2" on page 28 The "TILE MATRIX" feature allows one image to be displayed on multiple screens. This feature can be used with up to 25 monitors. (5 horizontal x 5 vertical) Using the Tile Matrix function requires the PC output signal to be sent through a distribution amplifier to each individual monitor. H MONITORS: Selects the number of horizontal displays. V MONITORS: Selects the number of vertical displays. POSITION: Selects a position to expand the screen. TILE COMP: Works in tandem with "TILE MATRIX" to compensate for the width of the tiled bezels in order to accurately display the image. ENABLE: Select "YES", to expand the signal to the selected settings. PIP, POP, SIDE by SIDE, STILL and DYNAMIC zoom mode will be disabled when the "TILE MATRIX" is activated. Note: LCD4010 and LCD4610 Displays can NOT be used together with the Tile Matrix function. HEAT STATUS STATUS COOLING FAN1 COOLING FAN2 BRIGHTNESS TEMPERATURE SENSOR 1 0.0 SENSOR 2 0.0 ON ON NORMAL C / 32.0 F C / 32.0 F EXIT :RETURN MENU :EXIT MENU Displays status of COOLING FAN, BRIGHTNESS and TEMPERATURE. COOLING FAN activates when the inside temperature exceeds highest recommended operating temperature BRIGHTNESS decreases when inside temperature exceeds highest recommended operating temperature with cooling fan running. In this case a warning is displayed on the screen. POWER ON DELAY 3 SEC. + -:ADJ EXIT :RETURN MENU :EXIT MENU Adjusts the delay time from "standby" to "power on" mode. "POWER ON DELAY" can be set between 0 and 50 sec. DATE & TIME SCHEDULE ADVANCED OPTION RESET ADVANCED OPTION MONITOR ID IR CONTROL TILE MATRIX HEAT STATUS POWER ON DELAY DATE & TIME SCHEDULE ADVANCED OPTION RESET :SEL SET :NEXT EXIT :RETURN MENU :EXIT MENU ADVANCED OPTION MONITOR ID IR CONTROL TILE MATRIX HEAT STATUS POWER ON DELAY DATE & TIME SCHEDULE ADVANCED OPTION RESET :SEL SET :NEXT EXIT :RETURN MENU :EXIT MENU ADVANCED OPTION MONITOR ID IR CONTROL TILE MATRIX HEAT STATUS POWER ON DELAY DATE & TIME SCHEDULE ADVANCED OPTION RESET :SEL SET :NEXT EXIT :RETURN MENU :EXIT MENU DATE & TIME YEAR MONTH DAY TIME DAYLIGHT SAVING 2004 JANUARY 01 00 : 00 YES / NO CURRENT DATE TIME JAN. 01. 2004 00 : 00 : 00 :SEL+ -:ADJ SET :SET EXIT :RETURN MENU :EXIT MENU Sets the current date and time for internal clock. You should set this function, when you use "SCHEDULE". Date and time has to be set in order for the "SCHEDULE" function to work properly. SCHEDULE 1 TODAY THURSDAY, ON OFF 10 : 00 17 : 00 MON TUE WED JAN. 01. 2004 10:00 THU INPUT RGB 1 FRI SAT SUN EVERY DAY EVERY WEEK 2 ON OFF INPUT 11 : 00 18 : 00 RGB 1 EVERY DAY MON TUE WED THU FRI SAT SUN EVERY WEEK 3 ON OFF INPUT 00 : 00 10 : 00 RGB 1 EVERY DAY MON TUE WED THU FRI SAT SUN EVERY WEEK 4 ON OFF INPUT 00 : 00 10 : 00 RGB 1 EVERY DAY MON TUE WED THU FRI SAT SUN EVERY WEEK + - :SEL SET : SET EXIT :RETURN MENU :EXIT MENU Programs the monitor's working schedule. Sets the hour and day of the week when the monitor powers on or off. Also sets the input port. Select "EXIT" to set schedule. (see "NOTE 3" on page 28 for further information) ADVANCED OPTION RESET NO YES :SEL EXIT :RETURN MENU :EXIT MENU Selecting ADVANCED OPTION RESET allows you to reset all OSM settings from the ADVANCED OPTION settings, except for DATE & TIME, and SCHEDULE. Select "YES" and press "SET" button to restore the factory preset data. Press "EXIT" button to cancel and then return the previous menu. English-27
-
 1
1 -
2
-
3
-
4
-
5
-
6
-
7
-
8
-
9
-
10
-
11
-
12
-
13
-
14
-
15
-
16
-
17
-
18
-
19
-
20
-
21
-
22
-
23
-
24
-
25
-
 26
26 -
 27
27 -
 28
28 -
 29
29 -
 30
30 -
 31
31 -
 32
32 -
 33
33 -
 34
34 -
 35
35 -
 36
36 -
37
-
38
-
39
-
40
-
41
-
42
-
43
-
44
-
45
-
46
-
47
-
48
-
49
-
50
-
51
-
52
-
53
-
54
-
55
-
56
-
57
-
58
-
59
-
60
-
61
-
62
-
63
-
64
-
65
-
66
-
67
-
68
-
69
-
70
-
71
-
72
-
73
-
74
-
75
-
76
-
77
-
78
-
79
-
80
-
81
-
82
-
83
-
84
-
85
-
86
-
87
-
88
 |
 |
