NEC NP-P451W User's Manual - Page 74
(2) Preparing presentation materials, Place a check mark for Embed all fonts.
 |
View all NEC NP-P451W manuals
Add to My Manuals
Save this manual to your list of manuals |
Page 74 highlights
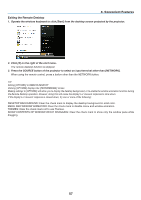
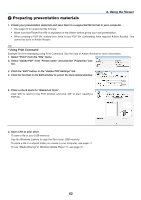
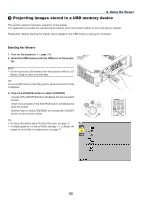
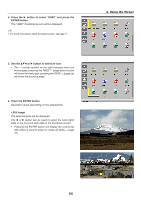
❷ Preparing presentation materials 4. Using the Viewer 1. Create your presentation materials and save them in a supported file format to your computer. • See page 86 for supported file formats. • Make sure that PowerPoint file is displayed on the Viewer before giving your real presentation. • When creating a PDF file, embed your fonts in your PDF file. Embedding fonts requires Adobe Acrobat. This cannot be done in Adobe Reader. TIP: • Using Print Command Example for font embedding using Print Command. See the help of Adobe Acrobat for more information. 1. Select "Print" from the "File" menu. 2. Select "Adobe PDF" from "Printer name" and click the "Properties" button. 3. Click the "Edit" button in the "Adobe PDF Settings" tab. 4. Click the font tab in the Edit window to select the font embed window. 5. Place a check mark for "Embed all fonts". Click "OK" to return to the Print window, and click "OK" to start creating a PDF file. 2. Save a file to your drive. To save a file to your USB memory: Use the Windows Explore to copy the file to your USB memory. To place a file in a shared folder you create in your computer, see page 77. To use "Media Sharing" in Windows Media Player 11, see page 81. 62
-
 1
1 -
2
-
3
-
4
-
5
-
6
-
7
-
8
-
9
-
10
-
11
-
12
-
13
-
14
-
15
-
16
-
17
-
18
-
19
-
20
-
21
-
22
-
23
-
24
-
25
-
26
-
27
-
28
-
29
-
30
-
31
-
32
-
33
-
34
-
35
-
36
-
37
-
38
-
39
-
40
-
41
-
42
-
43
-
44
-
45
-
46
-
47
-
48
-
49
-
50
-
51
-
52
-
53
-
54
-
55
-
56
-
57
-
58
-
59
-
60
-
61
-
62
-
63
-
64
-
65
-
66
-
67
-
68
-
 69
69 -
 70
70 -
 71
71 -
 72
72 -
 73
73 -
 74
74 -
 75
75 -
 76
76 -
 77
77 -
 78
78 -
 79
79 -
80
-
81
-
82
-
83
-
84
-
85
-
86
-
87
-
88
-
89
-
90
-
91
-
92
-
93
-
94
-
95
-
96
-
97
-
98
-
99
-
100
-
101
-
102
-
103
-
104
-
105
-
106
-
107
-
108
-
109
-
110
-
111
-
112
-
113
-
114
-
115
-
116
-
117
-
118
-
119
-
120
-
121
-
122
-
123
-
124
-
125
-
126
-
127
-
128
-
129
-
130
-
131
-
132
-
133
-
134
-
135
-
136
-
137
-
138
-
139
-
140
-
141
-
142
-
143
-
144
-
145
-
146
-
147
-
148
-
149
-
150
-
151
-
152
-
153
-
154
-
155
-
156
-
157
-
158
-
159
-
160
-
161
-
162
-
163
-
164
-
165
-
166
-
167
-
168
-
169
-
170
-
171
-
172
-
173
-
174
-
175
-
176
-
177
-
178
-
179
-
180
-
181
-
182
-
183
-
184
-
185
-
186
-
187
-
188
-
189
-
190
-
191
-
192
-
193
-
194
-
195
-
196
-
197
-
198
-
199
-
200
-
201
-
202
-
203
-
204
-
205
-
206
-
207
-
208
-
209
-
210
-
211
-
212
-
213
-
214
-
215
-
216
-
217
-
218
-
219
-
220
-
221
-
222
-
223
-
224
-
225
-
226
-
227
-
228
-
229
-
230
-
231
 |
 |
