NEC PX-42XM2A 42VP4/42XM2/50XM3/61XM2 - Page 38
Example: Setting the PICTURE SIZE mode to, Example: Setting the PLUG/PLAY mode to STB
 |
View all NEC PX-42XM2A manuals
Add to My Manuals
Save this manual to your list of manuals |
Page 38 highlights
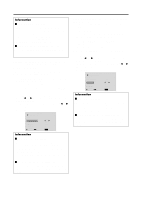
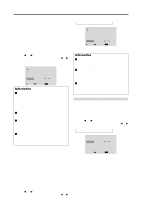
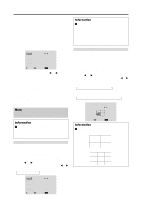
Information Ⅵ S1/S2 settings AUTO .....Adjusts the screen size automatically according to the S1/S2 video signal. OFF ....... Turns the S1/S2 function off. Ⅵ Restoring the factory default settings Select "ALL RESET" under the OPTION1 menu. Note that this also restores other settings to the factory defaults. Setting the picture size for RGB input signals Use this procedure to switch the setting to "ON" or "OFF". * Cannot be set in some models. Example: Setting the "PICTURE SIZE" mode to "OFF" Set "ADVANCED OSM" to "ON" in the main menu (1/ 2), then perform the following operations. 1. On the MAIN MENU, select "OPTION2", then press the MENU/ENTER button. The "OPTION2" screen appears. 2. Use the v and w buttons to select "PICTURE SIZE". 3. To set PICTURE SIZE mode to "OFF"... Use the ᮤ and ᮣ buttons to select "OFF". The mode switches as follows each time the ᮤ or ᮣ button is pressed: ON ↔ OFF OPTION2 2 / 3 PREVIOUS PAGE POWER MGT. : OFF CINEMA MODE : ON LONG LIFE GRAY LEVEL : 3 S1/S2 : OFF PICTURE SIZE : OFF DVI SET UP NEXT PAGE SEL. ADJ. EXIT RETURN Information Ⅵ Restoring the factory default settings Select "ALL RESET" under the OPTION1 menu. Note that this also restores other settings to the factory defaults. Setting the signal and black level for DVI signal Choose the signal for the DVI connector (PC or STB/ DVD) and set the black level. This setting is possible only in the HDCP compatible (silver bezel) model. Example: Setting the "PLUG/PLAY" mode to "STB/ DVD" Set "ADVANCED OSM" to "ON" in the main menu (1/ 2), then perform the following operations. 1. On the MAIN MENU, select "OPTION2", then press the MENU/ENTER button. The "OPTION2" screen appears. 2. Use the v and w buttons to select "DVI SET UP", then press the MENU/ENTER button. The "DVI SET UP" screen appears. 3. To set PLUG/PLAY mode to "STB/DVD"... Use the ᮤ and ᮣ buttons to select "STB/DVD". The mode switches as follows each time the ᮤ or ᮣ button is pressed: PLUG/PLAY: PC ↔ STB/DVD BLACK LEVEL: LOW ↔ HIGH PLUG/PLAY BLACK LEVEL DVI SET UP : : STB/DVD HIGH SEL. ADJ. EXIT RETURN Information Ⅵ PLUG/PLAY settings PC When connected to the PC signal. BLACK LEVEL is set to "LOW" automatically. STB/DVD ... When connected to the SET TOP BOX, DVD etc. BLACK LEVEL is set to "HIGH" automatically. Ⅵ BLACK LEVEL settings LOW When connected to the PC signal. HIGH .......... When connected to the SET TOP BOX, DVD etc. Change "HIGH" into "OFF" if the black level appears gray. 31
-
 1
1 -
2
-
3
-
4
-
5
-
6
-
7
-
8
-
9
-
10
-
11
-
12
-
13
-
14
-
15
-
16
-
17
-
18
-
19
-
20
-
21
-
22
-
23
-
24
-
25
-
26
-
27
-
28
-
29
-
30
-
31
-
32
-
 33
33 -
 34
34 -
 35
35 -
 36
36 -
 37
37 -
 38
38 -
 39
39 -
 40
40 -
 41
41 -
 42
42 -
 43
43 -
44
-
45
-
46
-
47
-
48
-
49
-
50
-
51
-
52
 |
 |