NEC PX-50XM2A 50MP2 - Page 45
Setting high definition images to the suitable, screen size, Setting the picture size for RGB input
 |
View all NEC PX-50XM2A manuals
Add to My Manuals
Save this manual to your list of manuals |
Page 45 highlights
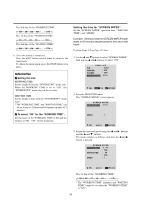
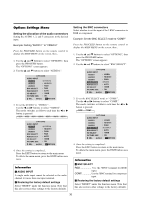
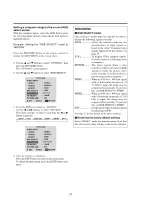
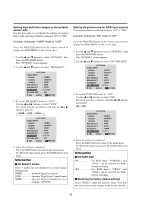
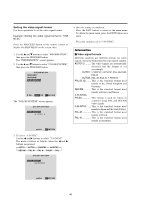
Setting high definition images to the suitable screen size Use this procedure to set whether the number of vertical lines of the input high definition image is 1035 or 1080. Example: Setting the "1080B" mode to "1035I" Press the PROCEED button on the remote control to display the MAIN MENU on the screen, then... 1. Use the L and M buttons to select "OPTIONS", then press the PROCEED button. The "OPTIONS" screen appears. 2. Use the L and M buttons to select "HD SELECT". OPTIONS AUDIO INPUT AUDIO1 AUDIO2 AUDIO3 BNC SELECT RGB SELECT HD SELECT PICTURE SIZE : VIDEO1 : HD/DVD1 : RGB1 : RGB : AUTO : 1080B : ON SEL. ADJ. EXIT RETURN 3. To set the HD SELECT mode to "1035I" ... Use the ᮤ and ᮣ buttons to select "1035I". The mode switches as follows each time the ᮤ or ᮣ button is pressed: →1080B ↔ 1035I ↔ 1080A ← OPTIONS AUDIO INPUT AUDIO1 AUDIO2 AUDIO3 BNC SELECT RGB SELECT HD SELECT PICTURE SIZE : VIDEO1 : HD/DVD1 : RGB1 : RGB : AUTO : 1035I : ON SEL. ADJ. EXIT RETURN 4. Once the setting is completed ... Press the EXIT button to return to the main menu. To delete the main menu, press the EXIT button once more. Information Ⅵ HD SELECT modes These 3 modes are not displayed in correct image automatically. 1080B Standard digital broadcasts 1035I Japanese "High Vision" signal format 1080A Special Digital broadcasts (for example : DTC100) Setting the picture size for RGB input signals Use this procedure to switch the setting to "ON" or "OFF". Example: Setting the "ON" mode to "OFF" Press the PROCEED button on the remote control unit to display the MAIN MENU on the screen, then... 1. Use the L and M buttons to select "OPTIONS", then press the PROCEED button. The "OPTIONS" screen appears. 2. Use the L and M buttons to select "PICTURE SIZE". OPTIONS AUDIO INPUT AUDIO1 AUDIO2 AUDIO3 BNC SELECT RGB SELECT HD SELECT PICTURE SIZE : VIDEO1 : HD/DVD1 : RGB1 : RGB : AUTO : 1080B : ON SEL. ADJ. EXIT RETURN 3. To set PICTURE SIZE mode to "OFF"... Use the ᮤ and ᮣ buttons to select "OFF". The mode switches as follows when the ᮤ or ᮣ buttons are pressed: ON ↔ OFF OPTIONS AUDIO INPUT AUDIO1 AUDIO2 AUDIO3 BNC SELECT RGB SELECT HD SELECT PICTURE SIZE : VIDEO1 : HD/DVD1 : RGB1 : RGB : AUTO : 1080B : OFF SEL. ADJ. EXIT RETURN 4. Once the setting is completed ... Press the EXIT button to return to the main menu. To delete the main menu, press the EXIT button once more. Information Ⅵ PICTURE SIZE ON For RGB Input: "NORMAL" and "FULL" can be selected for WideScreen switching. OFF For RGB Input: "TRUE" and "FULL" can be selected for WideScreen switching. Ⅵ Restoring the factory default settings Select "RESET" under the function menu. Note that this also restores other settings to the factory defaults. 38
-
 1
1 -
2
-
3
-
4
-
5
-
6
-
7
-
8
-
9
-
10
-
11
-
12
-
13
-
14
-
15
-
16
-
17
-
18
-
19
-
20
-
21
-
22
-
23
-
24
-
25
-
26
-
27
-
28
-
29
-
30
-
31
-
32
-
33
-
34
-
35
-
36
-
37
-
38
-
39
-
 40
40 -
 41
41 -
 42
42 -
 43
43 -
 44
44 -
 45
45 -
 46
46 -
 47
47 -
 48
48 -
 49
49 -
 50
50 -
51
-
52
-
53
-
54
-
55
-
56
-
57
-
58
-
59
-
60
-
61
-
62
-
63
-
64
-
65
-
66
-
67
-
68
 |
 |
