NEC PX-61XR3A 50XR4/61XR3 UM - Page 10
Remote Control
 |
View all NEC PX-61XR3A manuals
Add to My Manuals
Save this manual to your list of manuals |
Page 10 highlights
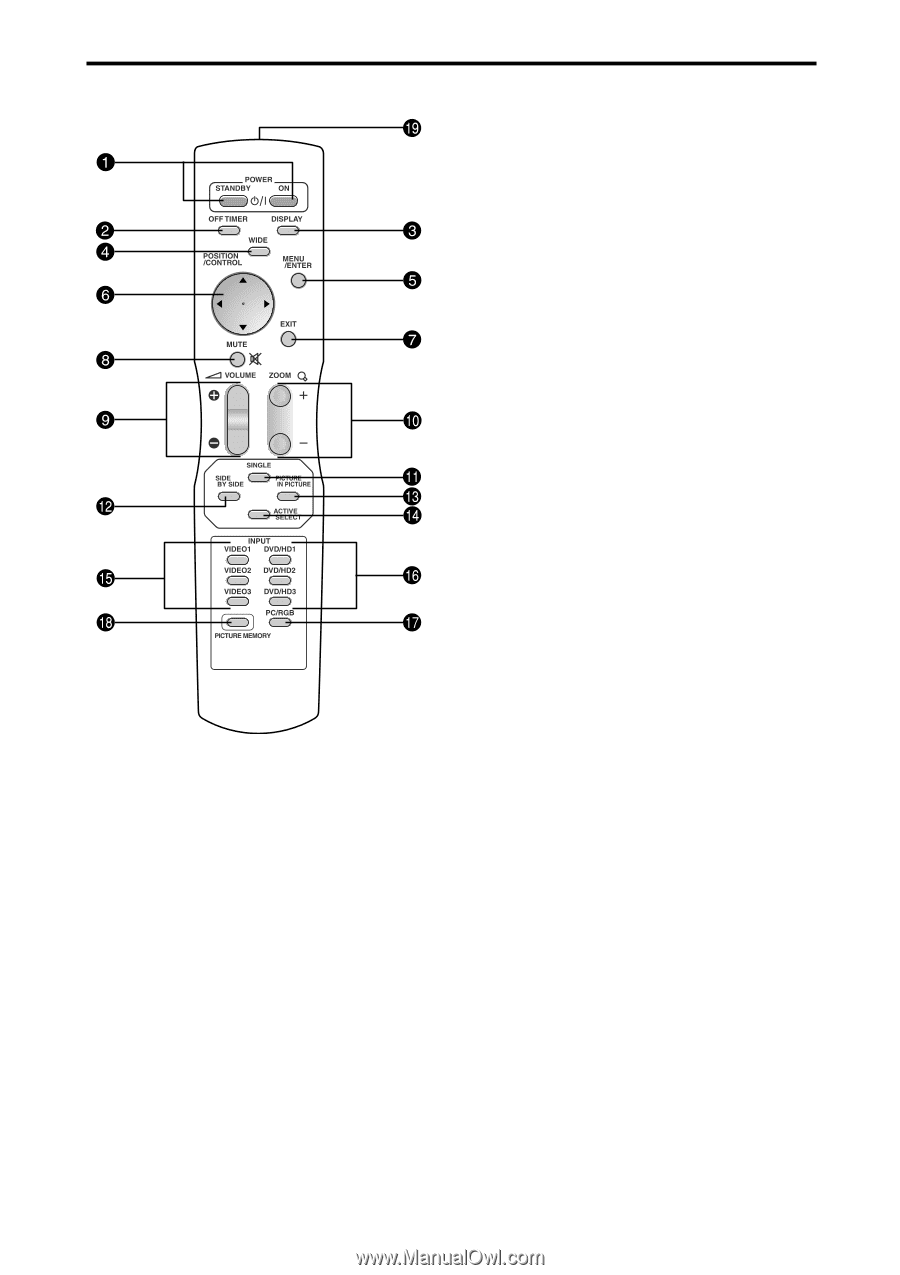
Remote Control i MUTE Mutes the audio. o VOLUME (+ /-) Adjusts the audio volume. !0 ZOOM (+ /-) Enlarges or reduces the image. !1 SINGLE Cancels the split screen mode. !2 SIDE BY SIDE Press this button to show a couple of pictures in the side-by-side mode. !3 PICTURE IN PICTURE Press this button to show a couple of pictures in the picture-in-picture mode. !4 ACTIVE SELECT Press this button to make the desired picture activate during split screen mode. !5 VIDEO1, 2, 3 Press this button to select VIDEO as the source. VIDEO can also be selected using the INPUT SELECT button on the monitor. !6 DVD/HD1, 2, 3 Press this button to select DVD/HD as the source. DVD/HD can also be selected using the INPUT SELECT button on the monitor. !7 PC/RGB Press this button to select PC/RGB as the source. PC/RGB can also be selected using the INPUT SELECT button on the monitor. !8 PICTURE MEMORY Switches sequentially between picture memory settings 1 to 6. !9 Remote control signal transmitter Transmits the remote control signals. q POWER ON/STANDBY Switches the power on/standby. (This does not operate when POWER/STANDBY indicator of the main unit is off.) w OFF TIMER Activates the off timer for the unit. e DISPLAY Displays the source settings on the screen. r WIDE Automatically detects the signal and sets the aspect ratio. Wide button is not active for all signals. t MENU/ENTER Press this button to access the OSM controls. Press this button during the display of the main menu to go to the sub menu. y CURSOR (v / w Use these buttons to select items or settings and to adjust settings or switch the display patterns. u EXIT Press this button to exit the OSM controls in the main menu. Press this button during the display of the sub menu to return to the previous menu. 10
-
 1
1 -
2
-
3
-
4
-
 5
5 -
 6
6 -
 7
7 -
 8
8 -
 9
9 -
 10
10 -
 11
11 -
 12
12 -
 13
13 -
 14
14 -
 15
15 -
16
-
17
-
18
-
19
-
20
-
21
-
22
-
23
-
24
-
25
-
26
-
27
-
28
-
29
-
30
-
31
-
32
-
33
-
34
-
35
-
36
 |
 |