NaceCare TGB2228 Owners Instructions - Page 12
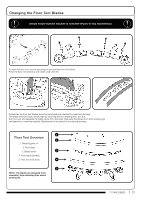
Changing the Floor Tool Blades
 |
View all NaceCare TGB2228 manuals
Add to My Manuals
Save this manual to your list of manuals |
Page 12 highlights
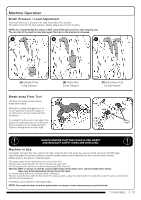
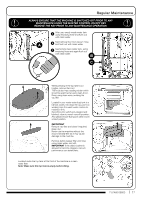
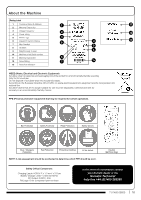
Changing the Floor Tool Blades ! Always ensure that the machine is switched off prior to any maintenance. ! To clean the floor tool, remove securing-pin and pull-free from the holder. Rinse the floor tool assembly with clean water and refit. Periodically the floor tool blades should be examined and checked for wear and damage. The blade removal is easy. Simply start by removing the four retaining pins, turn the floor tool over and separate the blade carrier from the body. Peel away the blades from their locating lugs and examine or renew as required. Replacement is a reversal of the removal process. 1 Floor Tool Overview 2 1. Retaining pins x 4 2. Rear blade 3. Blade carrier 3 4. Front blade (slotted) 5. Floor tool main body 4 5 NOTE: The blades are designed to be reversible, thus extending their useful working life. T 01460 68600 12
-
 1
1 -
2
-
3
-
4
-
5
-
6
-
 7
7 -
 8
8 -
 9
9 -
 10
10 -
 11
11 -
 12
12 -
 13
13 -
 14
14 -
 15
15 -
 16
16 -
 17
17 -
18
-
19
-
20
-
21
-
22
-
23
-
24
 |
 |
