Netgear EVA8000-100NAS User Manual - Page 16
If connecting to Ethernet LAN, connect the Digital Entertainer - remote control
 |
UPC - 606449049787
View all Netgear EVA8000-100NAS manuals
Add to My Manuals
Save this manual to your list of manuals |
Page 16 highlights
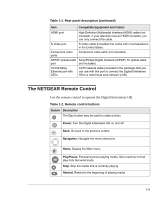
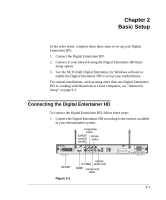
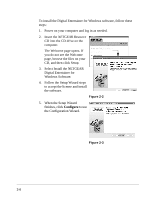
For example, connect the composite video cables between your entertainment system and the Digital Entertainer HD. If you use a digital audio/visual (A/V) receiver, using a S/PDIF coaxial or an optical cable to connect it is preferred. 2. Connect the Digital Entertainer HD to your network. • If connecting to Ethernet LAN, connect the Digital Entertainer HD to the LAN with an Ethernet cable. • If connecting to your wireless network, you will configure the wireless settings of the Digital Entertainer HD in the Basic Setup steps below. Be prepared to provide the wireless network name (also called SSID), and the wireless security settings for your network. 3. Connect the power cord and plug it into an outlet. The LED on the front of the Digital Entertainer HD lights up to show that it is powered on. 4. Install the two AA batteries into the remote control that came with the product. 5. Turn on the television and set the video source selector on your television to match the connection from your Digital Entertainer HD. For example, if you used an HDMI connector, set the television to use "Digital HD" or "HDMI" input. Optimize the television display as needed. • If it is not sharp, or you do not see a picture, aim the NETGEAR remote control at the Digital Entertainer HD, and push the TV Mode button. • You can cycle through the TV modes to get the best display. Note: It can take 3 or 4 seconds for each TV mode change. In some modes you may not see a picture on the TV. The Digital Entertainer HD will blink the power light to indicate that a TV mode change has occurred. If you do not see a picture after 4 mode changes, check the cable connections and verify that the TV is on and set to the correct input. 2-2
-
 1
1 -
2
-
3
-
4
-
5
-
6
-
7
-
8
-
9
-
10
-
 11
11 -
 12
12 -
 13
13 -
 14
14 -
 15
15 -
 16
16 -
 17
17 -
 18
18 -
 19
19 -
 20
20 -
 21
21 -
22
-
23
-
24
-
25
-
26
-
27
-
28
-
29
-
30
-
31
-
32
-
33
-
34
-
35
-
36
-
37
-
38
-
39
-
40
-
41
-
42
-
43
-
44
-
45
-
46
-
47
-
48
-
49
-
50
-
51
-
52
-
53
-
54
-
55
-
56
-
57
-
58
-
59
-
60
-
61
-
62
-
63
-
64
-
65
-
66
-
67
-
68
-
69
-
70
-
71
-
72
-
73
-
74
-
75
-
76
-
77
-
78
-
79
-
80
-
81
-
82
-
83
-
84
-
85
-
86
-
87
-
88
-
89
-
90
-
91
-
92
-
93
-
94
-
95
-
96
-
97
-
98
-
99
-
100
-
101
-
102
-
103
-
104
 |
 |