Netgear GS752TS GS7xxTS-TPS Software Admin Manual - Page 181
Advanced, Interface Queue Configuration, Queue ID, Minimum Bandwidth, Scheduler Type, Weighted, Strict
 |
View all Netgear GS752TS manuals
Add to My Manuals
Save this manual to your list of manuals |
Page 181 highlights
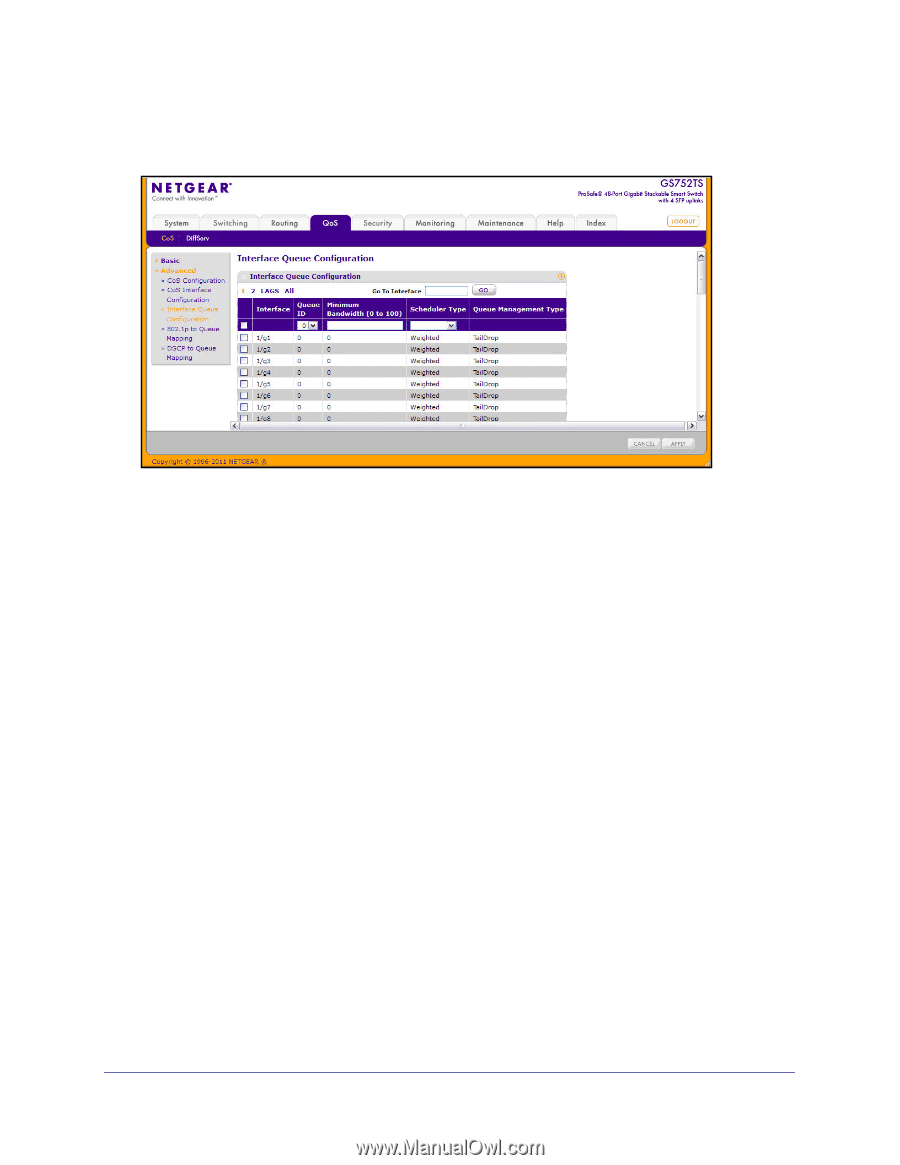
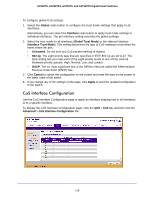
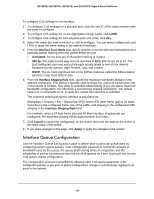
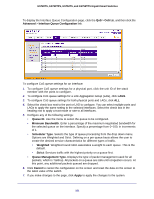
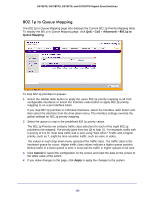
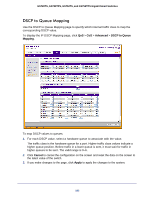
GS728TS, GS728TPS, GS752TS, and GS752TPS Gigabit Smart Switches To display the Interface Queue Configuration page, click the QoS > CoS tab, and then click the Advanced > Interface Queue Configuration link. To configure CoS queue settings for an interface: 1. To configure CoS queue settings for a physical port, click the unit ID of the stack member with the ports to configure. 2. To configure CoS queue settings for a Link Aggregation Group (LAG), click LAGS. 3. To configure CoS queue settings for both physical ports and LAGs, click ALL. 4. Select the check box next to the port or LAG to configure. You can select multiple ports and LAGs to apply the same setting to the selected interfaces. Select the check box in the heading row to apply a trust mode or rate to all interfaces. 5. Configure any of the following settings: • Queue ID. Use the menu to select the queue to be configured. • Minimum Bandwidth. Enter a percentage of the maximum negotiated bandwidth for the selected queue on the interface. Specify a percentage from 0-100, in increments of 1. • Scheduler Type. Selects the type of queue processing from the drop down menu. Options are Weighted and Strict. Defining on a per-queue basis allows the user to create the desired service characteristics for different types of traffic. • Weighted: Weighted round robin associates a weight to each queue. This is the default. • Strict: Services traffic with the highest priority on a queue first. • Queue Management Type. Displays the type of packet management used for all packets, which is Taildrop. All packets on a queue are safe until congestion occurs. At this point, any additional packets queued are dropped. 6. Click Cancel to cancel the configuration on the screen and reset the data on the screen to the latest value of the switch. 7. If you make changes to the page, click Apply to apply the changes to the system. 181
-
 1
1 -
2
-
3
-
4
-
5
-
6
-
7
-
8
-
9
-
10
-
11
-
12
-
13
-
14
-
15
-
16
-
17
-
18
-
19
-
20
-
21
-
22
-
23
-
24
-
25
-
26
-
27
-
28
-
29
-
30
-
31
-
32
-
33
-
34
-
35
-
36
-
37
-
38
-
39
-
40
-
41
-
42
-
43
-
44
-
45
-
46
-
47
-
48
-
49
-
50
-
51
-
52
-
53
-
54
-
55
-
56
-
57
-
58
-
59
-
60
-
61
-
62
-
63
-
64
-
65
-
66
-
67
-
68
-
69
-
70
-
71
-
72
-
73
-
74
-
75
-
76
-
77
-
78
-
79
-
80
-
81
-
82
-
83
-
84
-
85
-
86
-
87
-
88
-
89
-
90
-
91
-
92
-
93
-
94
-
95
-
96
-
97
-
98
-
99
-
100
-
101
-
102
-
103
-
104
-
105
-
106
-
107
-
108
-
109
-
110
-
111
-
112
-
113
-
114
-
115
-
116
-
117
-
118
-
119
-
120
-
121
-
122
-
123
-
124
-
125
-
126
-
127
-
128
-
129
-
130
-
131
-
132
-
133
-
134
-
135
-
136
-
137
-
138
-
139
-
140
-
141
-
142
-
143
-
144
-
145
-
146
-
147
-
148
-
149
-
150
-
151
-
152
-
153
-
154
-
155
-
156
-
157
-
158
-
159
-
160
-
161
-
162
-
163
-
164
-
165
-
166
-
167
-
168
-
169
-
170
-
171
-
172
-
173
-
174
-
175
-
 176
176 -
 177
177 -
 178
178 -
 179
179 -
 180
180 -
 181
181 -
 182
182 -
 183
183 -
 184
184 -
 185
185 -
 186
186 -
187
-
188
-
189
-
190
-
191
-
192
-
193
-
194
-
195
-
196
-
197
-
198
-
199
-
200
-
201
-
202
-
203
-
204
-
205
-
206
-
207
-
208
-
209
-
210
-
211
-
212
-
213
-
214
-
215
-
216
-
217
-
218
-
219
-
220
-
221
-
222
-
223
-
224
-
225
-
226
-
227
-
228
-
229
-
230
-
231
-
232
-
233
-
234
-
235
-
236
-
237
-
238
-
239
-
240
-
241
-
242
-
243
-
244
-
245
-
246
-
247
-
248
-
249
-
250
-
251
-
252
-
253
-
254
-
255
-
256
-
257
-
258
-
259
-
260
-
261
-
262
-
263
-
264
-
265
-
266
-
267
-
268
-
269
-
270
-
271
-
272
-
273
-
274
-
275
-
276
-
277
-
278
-
279
-
280
-
281
-
282
-
283
-
284
-
285
-
286
-
287
-
288
-
289
-
290
-
291
-
292
-
293
-
294
-
295
-
296
-
297
-
298
-
299
-
300
-
301
-
302
-
303
-
304
-
305
-
306
-
307
-
308
-
309
-
310
-
311
-
312
-
313
-
314
-
315
-
316
-
317
-
318
-
319
-
320
-
321
-
322
-
323
-
324
-
325
-
326
-
327
-
328
-
329
 |
 |