Netgear JGS524PE ProSafe Plus Switches Configuration Utility User Guide
Netgear JGS524PE Manual
 |
View all Netgear JGS524PE manuals
Add to My Manuals
Save this manual to your list of manuals |
Netgear JGS524PE manual content summary:
- Netgear JGS524PE | ProSafe Plus Switches Configuration Utility User Guide - Page 1
ProSafe® Plus Switch Utility User Guide 350 East Plumeria Drive San Jose, CA 95134 USA December 2012 202-10524-05 - Netgear JGS524PE | ProSafe Plus Switches Configuration Utility User Guide - Page 2
ProSafe Plus Switch Utility © NETGEAR, Inc. All rights reserved No part of this publication maybe reproduced, transmitted, transcribed, stored in a retrieval system, or translated into any language in any form or by any means without the written permission of NETGEAR, Inc. NETGEAR, the NETGEAR logo - Netgear JGS524PE | ProSafe Plus Switches Configuration Utility User Guide - Page 3
IP Address Information 19 Maintenance 19 Change Password 19 Device Reboot 19 Reset Factory Defaults 20 Firmware Upgrade 20 Save Configuration 20 Restore Configuration 21 Monitoring 21 Port Statistics 21 Port Mirroring 21 Cable Test 22 MultiCast 22 IGMP Snooping 22 Management 23 LAG - Netgear JGS524PE | ProSafe Plus Switches Configuration Utility User Guide - Page 4
ProSafe Plus Switch Utility Basic Port-Based VLAN Configuration 27 Advanced Port-Based VLAN Configuration 27 802.1Q-Based Configuration 28 Basic 802.1Q VLAN Configuration 28 Advanced 802.1Q VLAN Configuration 28 VLAN Configuration 28 VLAN Membership 29 Port PVID 29 Port Tagging 30 Chapter 4 - Netgear JGS524PE | ProSafe Plus Switches Configuration Utility User Guide - Page 5
1. Getting Started This chapter contains the following topics: • Install the ProSafe Plus Switch Utility • WinPCap Workaround for Windows 8 • Registration • Discovering Switches • Utility Features Overview • Switch Settings • Uninstall the Utility 1 5 - Netgear JGS524PE | ProSafe Plus Switches Configuration Utility User Guide - Page 6
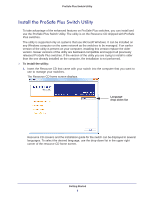
ProSafe Plus Switch Utility Install the ProSafe Plus Switch Utility To take advantage of the enhanced features on ProSafe Plus switches, you can install and use the ProSafe Plus Switch Utility. The utility is on the Resource CD shipped with ProSafe Plus switches. The utility is supported only on - Netgear JGS524PE | ProSafe Plus Switches Configuration Utility User Guide - Page 7
to navigate to the CD and double-click Autorun.exe. Autorun Note: The utility name might vary slightly between different ProSafe Plus switch models. 2. Click the Install ProSafe Plus Utility link. The utility uses two network programs, WinPcap and Adobe AIR, to process network commands. WinPcap - Netgear JGS524PE | ProSafe Plus Switches Configuration Utility User Guide - Page 8
, copies the utility program into the \Program Files\Netgear\ProSafe Plus Utility directory, and places a utility icon on the . The pop-up screen displays again if the switch is selected 24 hours after the switch is restored to factory default settings. • Remind Me Later. The Registration screen - Netgear JGS524PE | ProSafe Plus Switches Configuration Utility User Guide - Page 9
few seconds, the utility discovers and lists all ProSafe Plus switches in your network or in the same broadcast domain. Discovery continues through the network until blocked by a router or firewall. The discovered switches are listed as shown. You can now select a switch to configure or display its - Netgear JGS524PE | ProSafe Plus Switches Configuration Utility User Guide - Page 10
MAC address, IP address, subnet mask, and gateway address as well as changing the switch password for all switches. • Maintenance. Allows you to change the administrator password, reboot the switch, reset to factory default settings, and if your switch supports it, upgrade switch firmware and save - Netgear JGS524PE | ProSafe Plus Switches Configuration Utility User Guide - Page 11
your product at the NETGEAR website. Switch Settings Default settings for the management features are listed in Appendix A, Default Settings. Note: It is possible to specify port settings that block further access to the switch you are configuring. You can reset the switch manually to restore access - Netgear JGS524PE | ProSafe Plus Switches Configuration Utility User Guide - Page 12
ProSafe Plus Switch Utility Uninstall the Utility You can uninstall the ProSafe Plus Utility. To uninstall the utility: 1. Select Start > Control Panel > Add or Remove Programs. 2. Select ProSafe Plus Utility and click Change/Remove. You are prompted to confirm the remove command. 3. Click the Yes - Netgear JGS524PE | ProSafe Plus Switches Configuration Utility User Guide - Page 13
2. Network and System Configuration This chapter contains the following topics: • Network Switch Access • System Features • Network • Maintenance • Monitoring • MultiCast • Management • LAG 2 13 - Netgear JGS524PE | ProSafe Plus Switches Configuration Utility User Guide - Page 14
ProSafe Plus Switch Utility Network Switch Access When you click the Network tab, a list of discovered Plus switches in your network displays. You can select a switch to display general information, enable DHCP, and configure the IP address, subnet mask, and gateway of the selected switch. To access - Netgear JGS524PE | ProSafe Plus Switches Configuration Utility User Guide - Page 15
or disable LAGs (link aggregation group). Table 1. Features available from the System tab Feature Status Switch Status Switch Information Maintenance Change Password Device Reboot Factory Default Firmware Upgrade Save Configuration Restore Configuration Monitoring Port Statistics Mirroring Cable - Netgear JGS524PE | ProSafe Plus Switches Configuration Utility User Guide - Page 16
the utility to change the switch's IP and subnet. To select a switch: 1. Select the row for the desired switch and click Apply. You are asked to enter the password. The default password for all switches is password. 2. Enter the switch password and click Login. Network and System Configuration 16 - Netgear JGS524PE | ProSafe Plus Switches Configuration Utility User Guide - Page 17
ProSafe Plus Switch Utility The port status for the switch displays. This screen displays the status (up or down) of the ports on the switch and the speed of the device connected to the port. The switch automatically senses the speed of the device connected to each port. You can assign a name to the - Netgear JGS524PE | ProSafe Plus Switches Configuration Utility User Guide - Page 18
the switch is powered on or reset, it requests an IP address from a DHCP server in the network. This is called a dynamic IP address. If your network does not have a DHCP server, a time-out message displays. If the switch fails to retrieve an IP address from a DHCP server, a default IP address of - Netgear JGS524PE | ProSafe Plus Switches Configuration Utility User Guide - Page 19
IP address, subnet mask, and if available, the gateway address, and click Apply. Maintenance The Maintenance feature allows you to change the password for the selected switch, perform a device reboot, reset the switch to its factory default settings, or upgrade the switch firmware. Change Password - Netgear JGS524PE | ProSafe Plus Switches Configuration Utility User Guide - Page 20
ProSafe Plus Switch Utility Reset Factory Defaults WARNING: Resetting the switch to factory defaults can briefly disrupt network traffic through the switch. To reset the selected switch to factory default settings: 1. Select System > Maintenance > Factory Default. The Factory Default screen. 2. - Netgear JGS524PE | ProSafe Plus Switches Configuration Utility User Guide - Page 21
ProSafe Plus Switch Utility The Save Configuration screen displays. 2. Click the Browse button and navigate to the location on your computer where you want to save the configuration. 3. Click Apply. The configuration is saved in the designated file. Restore Configuration To restore a previously - Netgear JGS524PE | ProSafe Plus Switches Configuration Utility User Guide - Page 22
ProSafe Plus Switch Utility Cable Test Some switch models have a cable testing feature that allows you to check for cable faults. If a cable fault is found on a port, the cable test gives an estimate of the distance of the fault from the switch. To perform a cable test: 1. Click System > - Netgear JGS524PE | ProSafe Plus Switches Configuration Utility User Guide - Page 23
ProSafe Plus Switch Utility only to the ports that request the multicast traffic. This feature prevents the switch from broadcasting the traffic to all ports and possibly affecting network performance. To enable or disable IGMP snooping, in the IGMP Snooping Status list, select Enable or Disable and - Netgear JGS524PE | ProSafe Plus Switches Configuration Utility User Guide - Page 24
ProSafe Plus Switch Utility LAG Link aggregation groups (LAGs) allow you to combine multiple Ethernet links to a single logical link. Network devices treat the aggregation as if it were a single link, which increases fault tolerance and load sharing. Configure the LAG members before you enable the - Netgear JGS524PE | ProSafe Plus Switches Configuration Utility User Guide - Page 25
3. Virtual LAN Configuration This chapter contains the following topics: • VLAN Overview • Port-Based Configuration • 802.1Q-Based Configuration 3 25 - Netgear JGS524PE | ProSafe Plus Switches Configuration Utility User Guide - Page 26
ProSafe Plus Switch Utility VLAN Overview Virtual LANs are made up of networked devices that are grouped logically into separate networks. You can group ports on a switch to create a virtual network made up of the devices connected to the ports. VLANs can be grouped using port-based or 802.1Q - Netgear JGS524PE | ProSafe Plus Switches Configuration Utility User Guide - Page 27
ProSafe Plus Switch Utility Port-Based Configuration Port-based virtual LAN configuration assigns ports on the selected switch to a virtual LAN group. The number of VLANs that can be created is limited to the number of ports on the switch. Basic Port-Based VLAN Configuration The Basic Port Based - Netgear JGS524PE | ProSafe Plus Switches Configuration Utility User Guide - Page 28
ProSafe Plus Switch Utility The Advanced Port-Based VLAN Configuration screen displays. Note: VLAN IDs are limited to the number of ports on the switch, 1-5 for a five-port switch. 6. Select a VLAN ID from the VLAN identifier list and select the ports that you want to add to the VLAN. 7. Click Apply - Netgear JGS524PE | ProSafe Plus Switches Configuration Utility User Guide - Page 29
ProSafe Plus Switch Utility To add VLAN groups: In the VLAN ID field at the bottom right of the screen, enter the VLAN ID (1-4094) for the VLAN you want to configure and click Add. The new VLAN group is displayed in the VLAN ID column. 7. After you create a new VLAN ID, click VLAN Membership to - Netgear JGS524PE | ProSafe Plus Switches Configuration Utility User Guide - Page 30
ProSafe Plus Switch Utility 2. Select VLAN > 802.1Q > Advanced > Port PVID. The Port PVID screen displays. 3. Select the port you want to configure. 4. Enter the PVID you want to assign to the ports and click Apply. Port Tagging Port tagging allows a port to add VLAN ID tags to data packets sent - Netgear JGS524PE | ProSafe Plus Switches Configuration Utility User Guide - Page 31
4. Quality of Service This chapter contains the following topics: • QoS Overview • Rate Limiting • Broadcast Filtering 4 31 - Netgear JGS524PE | ProSafe Plus Switches Configuration Utility User Guide - Page 32
packets from being forwarded to all ports. All the QoS features have default settings. It is not necessary to configure any settings to use the ProSafe Plus switches. The following table lists the default settings. Table 2. QoS Global Configuration Default Settings Feature Setting QoS Mode 802 - Netgear JGS524PE | ProSafe Plus Switches Configuration Utility User Guide - Page 33
ProSafe Plus Switch Utility browsing, and ordinary data transfers) and high priority to video, voice, and other delay-sensitive data. Port-Based Priority Port-based priority works by assigning a priority to all data passing through a particular port. A higher priority transmits data with a minimum - Netgear JGS524PE | ProSafe Plus Switches Configuration Utility User Guide - Page 34
ProSafe Plus Switch Utility Other switches allow four levels (High, Medium, Normal, and Low). 4 priority levels To assign port-based priorities: 1. Click the System tab and select the radio button for the switch that you want to configure. 2. Click the QoS tab. The QoS Global Configuration screen - Netgear JGS524PE | ProSafe Plus Switches Configuration Utility User Guide - Page 35
ProSafe Plus Switch Utility 3. Select the 802.1p Based radio button. A message displays warning you that previous QoS settings for the switch will be lost. 4. Click Yes. Data is now processed based on 802.1p priority tags in the data. Rate Limiting You can limit the rate at which the switch accepts - Netgear JGS524PE | ProSafe Plus Switches Configuration Utility User Guide - Page 36
ProSafe Plus Switch Utility If the selected switch supports configuring individual ports, a Storm Control Rate screen displays. If the selected switch does not support individual port configuration, all of the ports are set to a predetermined storm control rate. 5. If the ports can be configured, - Netgear JGS524PE | ProSafe Plus Switches Configuration Utility User Guide - Page 37
5. Help This chapter contains the following topics: • Online Help • About the Utility • Registration 5 37 - Netgear JGS524PE | ProSafe Plus Switches Configuration Utility User Guide - Page 38
ProSafe Plus Switch Utility Online Help The Help tab provides access to the NETGEAR support website and to the online user guide for the ProSafe Plus Switch Utility (the latest copy of this manual). Help 38 - Netgear JGS524PE | ProSafe Plus Switches Configuration Utility User Guide - Page 39
to open the latest version of this user guide. You can then download a copy to your computer. After installing a new ProSafe Plus switch, check this website for the latest version of this manual. Support Information If the computer running the utility has access to the Internet, you can display - Netgear JGS524PE | ProSafe Plus Switches Configuration Utility User Guide - Page 40
ProSafe Plus Switch Utility Registration If the computer running the utility has access to the Internet, you can register your products. To register your product: 1. Select Help > Registration to display the following screen: 2. Click REGISTER. Your computer connects to NETGEAR product - Netgear JGS524PE | ProSafe Plus Switches Configuration Utility User Guide - Page 41
blank Switch Information DHCP Mode Enabled IP Address 192.168.0.239 Subnet Mask 255.255.255.0 Gateway Address 192.168.0.254 Maintenance Change Password All fields blank Device Reboot Unchecked Factory Default Unchecked Firmware Upgrade Filename blank Save Configuration Filename - Netgear JGS524PE | ProSafe Plus Switches Configuration Utility User Guide - Page 42
ProSafe Plus Switch Utility Table 3. Default switch settings (continued) Tab VLAN QoS Help Menu Management LAG (JGS524E and XS708E only) Port Based 802.1Q Online Help About the Utility Registration Feature VLAN ID Enabled for IGMP Snooping Validate IGMPv3 IP header Block Unknown Multicast - Netgear JGS524PE | ProSafe Plus Switches Configuration Utility User Guide - Page 43
11, 15, 21 P port mirroring 21 port statistics 21 port tagging 30 port-based 26 port-based priority 33 PVID (Port Default VLAN ID) 29 Q QoS 11, 32 R rate limiting 35 rebooting device 19 reset 20 resetting factory defaults 20, 21 S status 10, 15 support 39 switch discovery 9 switch selection 16 - Netgear JGS524PE | ProSafe Plus Switches Configuration Utility User Guide - Page 44
VLANs 11, 26 VLANs, add groups 29 VLANs, advanced 27 VLANs, port-based 27 W WinPcap 7 ProSafe Plus Switch Utility 44
-
 1
1 -
 2
2 -
 3
3 -
 4
4 -
 5
5 -
 6
6 -
 7
7 -
8
-
9
-
10
-
11
-
12
-
13
-
14
-
15
-
16
-
17
-
18
-
19
-
20
-
21
-
22
-
23
-
24
-
25
-
26
-
27
-
28
-
29
-
30
-
31
-
32
-
33
-
34
-
35
-
36
-
37
-
38
-
39
-
40
-
41
-
42
-
43
-
44
 |
 |

350 East Plumeria Drive
San Jose, CA 95134
USA
December 2012
202-10524-05
ProSafe® Plus Switch Utility
User Guide