Netgear RNDP200U-100NAS Hardware Manual - Page 29
To access the boot menu, data loss might occur.
 |
View all Netgear RNDP200U-100NAS manuals
Add to My Manuals
Save this manual to your list of manuals |
Page 29 highlights
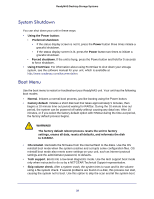
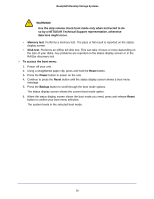
ReadyNAS Desktop Storage Systems WARNING! Use the skip volume check boot mode only when instructed to do so by a NETGEAR Technical Support representative, otherwise data loss might occur. • Memory test. Performs a memory test. The pass or fail result is reported on the status display screen. • Disk test. Performs an offline full disk test. This can take 4 hours or more depending on the size of your disks. Any problems are reported on the status display screen or in the RAIDar discovery tool. To access the boot menu: 1. Power off your unit. 2. Using a straightened paper clip, press and hold the Reset button. 3. Press the Power button to power on the unit. 4. Continue to press the Reset button until the status display screen shows a boot menu message. 5. Press the Backup button to scroll through the boot mode options. The status display screen shows the current boot mode option. 6. When the status display screen shows the boot mode you need, press and release Reset button to confirm your boot menu selection. The system boots in the selected boot mode. 29
-
 1
1 -
2
-
3
-
4
-
5
-
6
-
7
-
8
-
9
-
10
-
11
-
12
-
13
-
14
-
15
-
16
-
17
-
18
-
19
-
20
-
21
-
22
-
23
-
 24
24 -
 25
25 -
 26
26 -
 27
27 -
 28
28 -
 29
29 -
 30
30 -
 31
31 -
 32
32 -
 33
33 -
 34
34 -
35
-
36
-
37
-
38
-
39
-
40
-
41
-
42
-
43
-
44
-
45
-
46
-
47
-
48
 |
 |
