Netgear RNDP200U-100NAS Hardware Manual - Page 31
Previously Formatted Disks - diskless readynas ultra 2
 |
View all Netgear RNDP200U-100NAS manuals
Add to My Manuals
Save this manual to your list of manuals |
Page 31 highlights
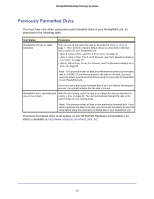
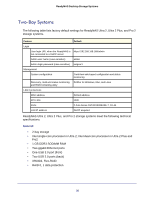
ReadyNAS Desktop Storage Systems Previously Formatted Disks You must take care when using previously formatted disks in your ReadyNAS unit, as described in the following table. Unit Status ReadyNAS unit has no disks (diskless) Precaution Turn the unit off and insert the disk as described in Diskless Units on page 7. Then, perform a factory default reboot as described in the boot menu section for your ReadyNAS unit: • Ultra 2, Ultra 2 Plus, and Pro 2 Boot Menu on page 14 • Ultra 4, Ultra 4 Plus, Pro 4, NVX Pioneer, and NVX (Business Edition) Boot Menu on page 21 • Ultra 6, Ultra 6 Plus, Pro 6, Pro Pioneer, and Pro (Business Edition) Boot Menu on page 28 Note: This process erases all data and reformats the previously formatted disk to X-RAID2. If you want to preserve the data on the disk, you must move the data to an external drive before using the previously formatted disk in your ReadyNAS unit. If you try to use a previously formatted disk in your unit without following this process, the unit will indicate that the disk is corrupt. ReadyNAS unit is operating with With the unit running, insert the disk in an empty disk bay as described in one or more disks Adding a Disk on page 32. The unit automatically formats the disk in the same format as your existing disks. Note: This process erases all data on the previously formatted disk. If you want to preserve the data on the disk, you must move the data to an external drive before using the previously formatted disk in your ReadyNAS unit. Previously formatted disks must appear on the NETGEAR Hardware Compatibility List, which is available at http://www.readynas.com/hard_disk_hcl. 31
-
 1
1 -
2
-
3
-
4
-
5
-
6
-
7
-
8
-
9
-
10
-
11
-
12
-
13
-
14
-
15
-
16
-
17
-
18
-
19
-
20
-
21
-
22
-
23
-
24
-
25
-
 26
26 -
 27
27 -
 28
28 -
 29
29 -
 30
30 -
 31
31 -
 32
32 -
 33
33 -
 34
34 -
 35
35 -
 36
36 -
37
-
38
-
39
-
40
-
41
-
42
-
43
-
44
-
45
-
46
-
47
-
48
 |
 |
