Netgear RNDX400E ReadyNAS NVX User Manual - Page 53
Browse, Upload and verify image, Automatically check for updates, Download updates automatically
 |
UPC - 606449068344
View all Netgear RNDX400E manuals
Add to My Manuals
Save this manual to your list of manuals |
Page 53 highlights
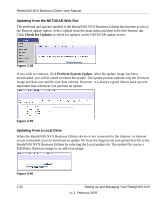
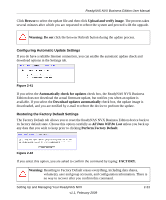
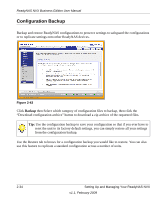
ReadyNAS NVX Business Edition User Manual Click Browse to select the update file and then click Upload and verify image. The process takes several minutes after which you are requested to reboot the system and proceed with the upgrade. Warning: Do not click the browser Refresh button during the update process. Configuring Automatic Update Settings If you do have a reliable Internet connection, you can enable the automatic update check and download options in the Settings tab. Figure 2-41 If you select the Automatically check for updates check box, the ReadyNAS NVX Business Edition does not download the actual firmware update, but notifies you when an update is available. If you select the Download updates automatically check box, the update image is downloaded, and you are notified by e-mail to reboot the device to perform the update. Restoring the Factory Default Settings The Factory Default tab allows you to reset the ReadyNAS NVX Business Edition device back to its factory default state. Choose this option carefully as All Data Will Be Lost unless you back up any data that you wish to keep prior to clicking Perform Factory Default. Figure 2-42 If you select this option, you are asked to confirm the command by typing: FACTORY. Warning: Resetting to Factory Default erases everything, including data shares, volume(s), user and group accounts, and configuration information. There is no way to recover after you confirm this command. Setting Up and Managing Your ReadyNAS NVX v1.1, February 2009 2-33
-
 1
1 -
2
-
3
-
4
-
5
-
6
-
7
-
8
-
9
-
10
-
11
-
12
-
13
-
14
-
15
-
16
-
17
-
18
-
19
-
20
-
21
-
22
-
23
-
24
-
25
-
26
-
27
-
28
-
29
-
30
-
31
-
32
-
33
-
34
-
35
-
36
-
37
-
38
-
39
-
40
-
41
-
42
-
43
-
44
-
45
-
46
-
47
-
 48
48 -
 49
49 -
 50
50 -
 51
51 -
 52
52 -
 53
53 -
 54
54 -
 55
55 -
 56
56 -
 57
57 -
 58
58 -
59
-
60
-
61
-
62
-
63
-
64
-
65
-
66
-
67
-
68
-
69
-
70
-
71
-
72
-
73
-
74
-
75
-
76
-
77
-
78
-
79
-
80
-
81
-
82
-
83
-
84
-
85
-
86
-
87
-
88
-
89
-
90
-
91
-
92
-
93
-
94
-
95
-
96
-
97
-
98
-
99
-
100
-
101
-
102
-
103
-
104
-
105
-
106
-
107
-
108
-
109
-
110
-
111
-
112
-
113
-
114
-
115
-
116
-
117
-
118
-
119
-
120
-
121
-
122
 |
 |
