Nikon 4800 User Manual - Page 70
Printing Via Direct USB Connection, Step 1 - Set the USB Option to PTP
 |
UPC - 018208255207
View all Nikon 4800 manuals
Add to My Manuals
Save this manual to your list of manuals |
Page 70 highlights
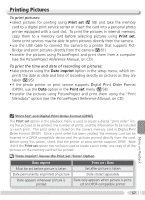
Printing Via Direct USB Connection When the camera is connected to a PictBridge-compatible printer via the UCE6 USB cable, selected pictures can be printed directly from the camera. Step 1 Set the USB option to PTP ( 60) Step 2 Connect the USB Cable ( 61) Step 3 Print • Print selected pictures ( 61) • Print DPOF print order ( 63) Step 1-Set the USB Option to PTP Before pictures can be printed via direct USB connection, the USB option in the setup menu must be set to PTP ( 54; the default option is Mass storage). Be sure to change the USB option before connecting the printer. More on Playback Before Printing Paper type, tray, and size selections are made from the printer; see the printer manual for details. Before printing, make sure that the printer supports PictBridge. Use a Reliable Power Source When printing pictures via direct USB connection, be sure the battery is fully charged. If in doubt, recharge the battery before printing or use the optional EH-54 AC adapter. Error Messages If the dialog shown at right is displayed, an error has occurred. After checking the printer and resolving any problems as directed in the printer manual, highlight Resume and press the center of the multi selector to resume printing. Select Cancel to exit without printing the remaining images. PRINTER ERROR CHECK PRINTER STATUS Resume Cancel PictBridge PictBridge is an industry standard for direct printing that ensures compatibility when different devices are connected. 60
-
 1
1 -
2
-
3
-
4
-
5
-
6
-
7
-
8
-
9
-
10
-
11
-
12
-
13
-
14
-
15
-
16
-
17
-
18
-
19
-
20
-
21
-
22
-
23
-
24
-
25
-
26
-
27
-
28
-
29
-
30
-
31
-
32
-
33
-
34
-
35
-
36
-
37
-
38
-
39
-
40
-
41
-
42
-
43
-
44
-
45
-
46
-
47
-
48
-
49
-
50
-
51
-
52
-
53
-
54
-
55
-
56
-
57
-
58
-
59
-
60
-
61
-
62
-
63
-
64
-
 65
65 -
 66
66 -
 67
67 -
 68
68 -
 69
69 -
 70
70 -
 71
71 -
 72
72 -
 73
73 -
 74
74 -
 75
75 -
76
-
77
-
78
-
79
-
80
-
81
-
82
-
83
-
84
-
85
-
86
-
87
-
88
-
89
-
90
-
91
-
92
-
93
-
94
-
95
-
96
-
97
-
98
-
99
-
100
-
101
-
102
-
103
-
104
-
105
-
106
-
107
-
108
-
109
-
110
-
111
-
112
-
113
-
114
-
115
-
116
-
117
-
118
-
119
-
120
-
121
-
122
-
123
-
124
-
125
 |
 |
