Nikon COOLPIX L30 Product Manual - Page 142
Shooting Issues, Close-up, AF assist, Electronic VR, Motion detection, Continuous, Multi-shot 16
 |
View all Nikon COOLPIX L30 manuals
Add to My Manuals
Save this manual to your list of manuals |
Page 142 highlights
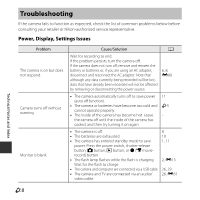
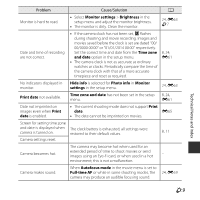
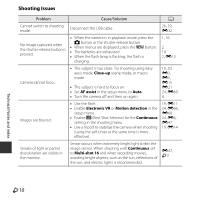
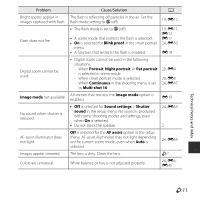
Shooting Issues Problem Cause/Solution A Cannot switch to shooting mode. Disconnect the USB cable. 26, 29, E32 No image captured when the shutter-release button is pressed. • When the camera is in playback mode, press the A button or the shutter-release button. • When menus are displayed, press the d button. • The batteries are exhausted. • When the flash lamp is flashing, the flash is charging. 1, 16 2 10 2, E13 Camera cannot focus. • The subject is too close. Try shooting using easy auto mode, Close-up scene mode, or macro mode. • The subject is hard to focus on. • Set AF assist in the setup menu to Auto. • Turn the camera off and then on again. 19, 20, E3, E5, E15 E21 24, E69 8 Images are blurred. • Use the flash. • Enable Electronic VR or Motion detection in the setup menu. • Enable D (Best Shot Selector) for the Continuous setting in the shooting menu. • Use a tripod to stabilize the camera when shooting (using the self-timer at the same time is more effective). 19, E11 24, E66, E68 24, E6, E47 19, E14 Streaks of light or partial discoloration are visible in the monitor. Smear occurs when extremely bright light strikes the image sensor. When shooting with Continuous set to Multi-shot 16 and when recording movies, avoiding bright objects, such as the sun, reflections of the sun, and electric lights is recommended. E47, F3 Technical Notes and Index F10
-
 1
1 -
2
-
3
-
4
-
5
-
6
-
7
-
8
-
9
-
10
-
11
-
12
-
13
-
14
-
15
-
16
-
17
-
18
-
19
-
20
-
21
-
22
-
23
-
24
-
25
-
26
-
27
-
28
-
29
-
30
-
31
-
32
-
33
-
34
-
35
-
36
-
37
-
38
-
39
-
40
-
41
-
42
-
43
-
44
-
45
-
46
-
47
-
48
-
49
-
50
-
51
-
52
-
53
-
54
-
55
-
56
-
57
-
58
-
59
-
60
-
61
-
62
-
63
-
64
-
65
-
66
-
67
-
68
-
69
-
70
-
71
-
72
-
73
-
74
-
75
-
76
-
77
-
78
-
79
-
80
-
81
-
82
-
83
-
84
-
85
-
86
-
87
-
88
-
89
-
90
-
91
-
92
-
93
-
94
-
95
-
96
-
97
-
98
-
99
-
100
-
101
-
102
-
103
-
104
-
105
-
106
-
107
-
108
-
109
-
110
-
111
-
112
-
113
-
114
-
115
-
116
-
117
-
118
-
119
-
120
-
121
-
122
-
123
-
124
-
125
-
126
-
127
-
128
-
129
-
130
-
131
-
132
-
133
-
134
-
135
-
136
-
 137
137 -
 138
138 -
 139
139 -
 140
140 -
 141
141 -
 142
142 -
 143
143 -
 144
144 -
 145
145 -
 146
146 -
 147
147 -
148
-
149
-
150
-
151
-
152
-
153
-
154
-
155
-
156
-
157
-
158
-
159
-
160
 |
 |
