Nikon COOLPIX S30 Reference Manual - Page 115
Crop: Creating a Cropped Copy, Press the multi selector, in full-frame, playback mode
 |
View all Nikon COOLPIX S30 manuals
Add to My Manuals
Save this manual to your list of manuals |
Page 115 highlights
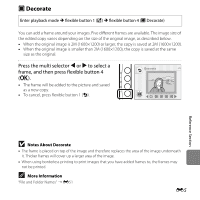
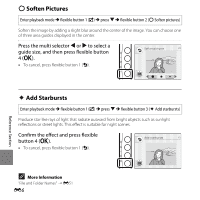
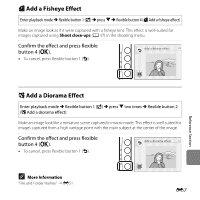
h Crop: Creating a Cropped Copy By pressing flexible button 4 (h) when using playback zoom (A 60), you can create a copy of the image that contains only the portion visible in the monitor. 1 Press the multi selector H in full-frame playback mode (A 25) to zoom in on the image. • To crop an image displayed in "tall" (portrait) orientation, zoom in on the image until the black bars displayed on the both sides of the monitor disappear. The cropped image will be displayed in landscape orientation. To crop the image in its current "tall" (portrait) orientation, first use the Rotate pictures option (E30) to rotate the image so that it is displayed in landscape orientation. Next, enlarge the image for cropping, crop the image, and then rotate the cropped image back to "tall" (portrait) orientation. 2 Refine copy composition. • Press the multi selector H or I to zoom in or out. • To move the displayed area, press flexible button 3 (G) to lock the zoom ratio, and then press the multi selector H, I, J, or K. 3 Press flexible button 4 (h). E9 Reference Section
-
 1
1 -
2
-
3
-
4
-
5
-
6
-
7
-
8
-
9
-
10
-
11
-
12
-
13
-
14
-
15
-
16
-
17
-
18
-
19
-
20
-
21
-
22
-
23
-
24
-
25
-
26
-
27
-
28
-
29
-
30
-
31
-
32
-
33
-
34
-
35
-
36
-
37
-
38
-
39
-
40
-
41
-
42
-
43
-
44
-
45
-
46
-
47
-
48
-
49
-
50
-
51
-
52
-
53
-
54
-
55
-
56
-
57
-
58
-
59
-
60
-
61
-
62
-
63
-
64
-
65
-
66
-
67
-
68
-
69
-
70
-
71
-
72
-
73
-
74
-
75
-
76
-
77
-
78
-
79
-
80
-
81
-
82
-
83
-
84
-
85
-
86
-
87
-
88
-
89
-
90
-
91
-
92
-
93
-
94
-
95
-
96
-
97
-
98
-
99
-
100
-
101
-
102
-
103
-
104
-
105
-
106
-
107
-
108
-
109
-
 110
110 -
 111
111 -
 112
112 -
 113
113 -
 114
114 -
 115
115 -
 116
116 -
 117
117 -
 118
118 -
 119
119 -
 120
120 -
121
-
122
-
123
-
124
-
125
-
126
-
127
-
128
-
129
-
130
-
131
-
132
-
133
-
134
-
135
-
136
-
137
-
138
-
139
-
140
-
141
-
142
-
143
-
144
-
145
-
146
-
147
-
148
-
149
-
150
-
151
-
152
-
153
-
154
-
155
-
156
-
157
-
158
-
159
-
160
-
161
-
162
-
163
-
164
-
165
-
166
-
167
-
168
-
169
-
170
-
171
-
172
-
173
-
174
-
175
-
176
-
177
-
178
-
179
-
180
-
181
-
182
-
183
-
184
-
185
-
186
-
187
-
188
-
189
-
190
-
191
-
192
-
193
-
194
 |
 |
