NordicTrack 360 With Freemotion Technology English Manual - Page 11
Attach the Curl Pad 20 to the Curl Post 9
 |
View all NordicTrack 360 With Freemotion Technology manuals
Add to My Manuals
Save this manual to your list of manuals |
Page 11 highlights
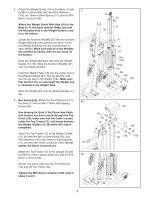
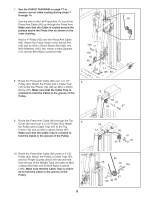
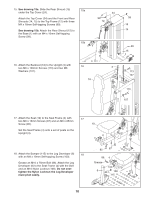
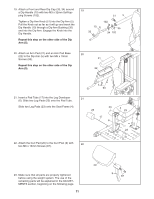
19. Attach a Front and Rear Dip Cap (33, 34) around a Dip Handle (10) with two M3 x 32mm Self-tapping Screws (102). Tighten a Dip Arm Knob (51) into the Dip Arm (5). Pull the Knob out as far as it will go and insert the Dip Handle (10) through a Dip Arm Bushing (35) and into the Dip Arm. Engage the Knob into the Dip Handle. Repeat this step on the other side of the Dip Arm (5). 19 10 33 51 5 102 35 34 102 20. Attach an Arm Pad (21) and an Arm Pad Base 20 (22) to the Dip Arm (5) with two M6 x 70mm Screws (93). Repeat this step on the other side of the Dip Arm (5). 21 22 5 93 21. Insert a Pad Tube (17) into the Leg Developer 21 (6). Slide two Leg Pads (23) onto the Pad Tube. Slide two Leg Pads (23) onto the Seat Frame (4). 23 23 17 6 4 23 23 22. Attach the Curl Pad (20) to the Curl Post (9) with 22 two M6 x 16mm Screws (87). 20 23. Make sure that all parts are properly tightened before using the weight system. The use of the remaining parts will be explained in the ADJUSTMENTS section, beginning on the following page. 11 9 87
-
 1
1 -
2
-
3
-
4
-
5
-
 6
6 -
 7
7 -
 8
8 -
 9
9 -
 10
10 -
 11
11 -
 12
12 -
 13
13 -
 14
14 -
 15
15 -
 16
16 -
17
-
18
-
19
-
20
-
21
-
22
-
23
-
24
 |
 |
