Oki C911dn C911dn/C931dn/C941dn Basic User's Guide - Page 73
Click [Recommended Install] to start, during the installation, connect
 |
View all Oki C911dn manuals
Add to My Manuals
Save this manual to your list of manuals |
Page 73 highlights
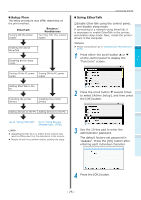
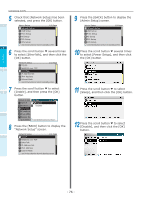
9 Click [Recommended Install] to start the installation. Connecting the PC 11 When the installation is complete, click [Exit]. 1 Before use Memo Click [Custom install] to select "PCL6 Driver" and "XPS Driver". 10 When the following screen is displayed during the installation, connect the device and PC using a USB cable, and then turn ON the device power supply. 2 3 12 In the menu screen, click [Exit]> [Yes]. Setting Up Printing 4 Basic Device Operations Memo If the display does not change even when the device is connected, click "Install using another port". Select the port to which the device is connected using the "Printer port" screen, and click [Next]. 13 Select [Start]> [Devices and Printers]. Appendix Index - 73 -
-
 1
1 -
2
-
3
-
4
-
5
-
6
-
7
-
8
-
9
-
10
-
11
-
12
-
13
-
14
-
15
-
16
-
17
-
18
-
19
-
20
-
21
-
22
-
23
-
24
-
25
-
26
-
27
-
28
-
29
-
30
-
31
-
32
-
33
-
34
-
35
-
36
-
37
-
38
-
39
-
40
-
41
-
42
-
43
-
44
-
45
-
46
-
47
-
48
-
49
-
50
-
51
-
52
-
53
-
54
-
55
-
56
-
57
-
58
-
59
-
60
-
61
-
62
-
63
-
64
-
65
-
66
-
67
-
 68
68 -
 69
69 -
 70
70 -
 71
71 -
 72
72 -
 73
73 -
 74
74 -
 75
75 -
 76
76 -
 77
77 -
 78
78 -
79
-
80
-
81
-
82
-
83
-
84
-
85
-
86
-
87
-
88
-
89
-
90
-
91
-
92
-
93
-
94
-
95
-
96
-
97
-
98
-
99
-
100
-
101
-
102
-
103
-
104
-
105
-
106
-
107
-
108
-
109
-
110
-
111
-
112
-
113
-
114
-
115
-
116
-
117
-
118
-
119
-
120
-
121
-
122
-
123
-
124
-
125
-
126
-
127
-
128
-
129
-
130
-
131
-
132
-
133
-
134
-
135
-
136
-
137
-
138
-
139
-
140
-
141
-
142
-
143
-
144
-
145
-
146
-
147
 |
 |

- 73 -
Connecting the PC
Appendix
Printing
3
Setting Up
2
Before use
1
Basic Device Operations
4
Index
9
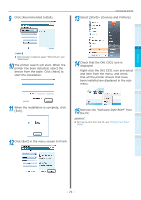
Click [Recommended Install] to start
the installation.
Memo
Click [Custom install] to select "PCL6 Driver" and
"XPS Driver".
10
When the following screen is displayed
during the installation, connect the
device and PC using a USB cable, and
then turn ON the device power supply.
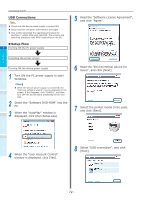
Memo
If the display does not change even when the device
is connected, click "Install using another port".
Select the port to which the device is connected
using the "Printer port" screen, and click [Next].
11
When the installation is complete, click
[Exit].
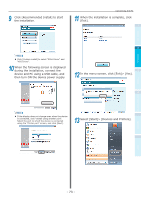
12
In the menu screen, click [Exit]> [Yes].
13
Select [Start]> [Devices and Printers].