Oki GL408e GL408e/GL412e RFID Kit Install Guide - Page 7
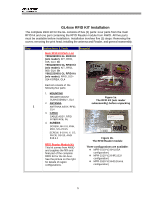
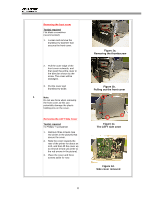
a., Turning the head lock latch, b., Print head removed - locked
 |
View all Oki GL408e manuals
Add to My Manuals
Save this manual to your list of manuals |
Page 7 highlights
Removing the Print Head 1. Release the print head assembly by turning the head lock latch counterclockwise. 2. Press the spring-loaded tab as indicated here, to release the print head. 3. Disconnect the data and power cables from the print head. 2 4. Set the print head aside for now. Note: ESD (electrostatic discharge) protection is recommended for this step. Anti-static lint-free gloves should be worn at all times when you are handling print heads. Figure 2a. Turning the head lock latch Figure 2b. Print head removed 7
-
 1
1 -
 2
2 -
 3
3 -
 4
4 -
 5
5 -
 6
6 -
 7
7 -
 8
8 -
 9
9 -
 10
10 -
 11
11
 |
 |

7
2
Removing the Print Head
1.
Release the print head
assembly by turning the head
lock latch counterclockwise.
2.
Press the spring-loaded tab
as indicated here, to release
the print head.
3.
Disconnect the data and
power cables from the print
head.
4.
Set the print head aside for
now.
Note:
ESD (electrostatic discharge)
protection is recommended for this
step. Anti-static lint-free gloves
should be worn at all times when
you are handling print heads.
Figure 2a.
Turning the head lock latch
Figure 2b.
Print head removed