Oki GL408e GL408e/GL412e RFID Kit Install Guide - Page 8
Oki GL408e Manual
 |
View all Oki GL408e manuals
Add to My Manuals
Save this manual to your list of manuals |
Page 8 highlights
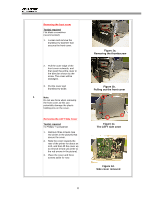
Installing the antenna Part(s) Required ANTENNA ASSY, RFID, SL4M SCREW, 6-19 HL X 1/2, PHCR, SS410, ANSI B18.6.4 Tool(s) required #1 Phillips + screwdriver - 12 in. lb 1. Remove the gap sensor paddle (circled red) by sliding it out. Set the gap sensor paddle aside for later use. 2. Remove the media guard (circled yellow) that is under the gap sensor, by removing the associated screw (circled blue). (Figure 3a) 3. Hook the purple catch of the antenna handle over the rod (circled blue) situated behind the black platen roller. The cable should emerge at the bottom of the printer. See Figures 3a and 3b. 4. The antenna handle replaces the removed media guard, and will be secured by the 3 same screw (circled blue in Fig 3d). Install the screw through the lower support hole and into the antenna handle as shown. 5. Tighten the screw to secure the antenna handle in place. 6. Re-install the gap sensor paddle. 7. Re-install the print head assembly. Note ESD (electrostatic discharge) protection is recommended for this step. Anti-static lint-free gloves are recommended to be worn at all times when handling the print head. The gap sensor paddle will be re-installed in the final step. The original media guard must be set aside and sent back to your supplier for recycling. 8 Figure 3a. Removing the gap sensor paddle (red) and media guard (yellow) antenna handle purple catch Figure 3b. Hook the antenna handle over the metal rod that is behind the platen roller. Figure 3c. The antenna emerges as shown. Figure 3c. Securing the antenna handle with the screw.
-
 1
1 -
2
-
 3
3 -
 4
4 -
 5
5 -
 6
6 -
 7
7 -
 8
8 -
 9
9 -
 10
10 -
 11
11
 |
 |
