Oki ML490 Maintenance Manual - Page 79
Remove the Control/Power Supply Board. see 3.3.15.
 |
View all Oki ML490 manuals
Add to My Manuals
Save this manual to your list of manuals |
Page 79 highlights
3.3.22 Switch Lever (1) Remove the upper cover (see 3.3.4 (1) - (5)). (2) Remove the Control/Power Supply Board. (see 3.3.15). (3) Remove the change lever and gears (see 3.3.17). (4) Remove the paper pan (see 3.3.19). (5) Remove the rear pressure assy (see 3.3.21). (6) Pull the Switch Lever toward you and remove it upward. (7) To install, follow the removal step in the reverse order. Remark on assembly: (1) At the time of the Switch Lever assembly, make sure that the Micro switch on the Power Supply Board works properly. Switch lever Switch lever Micro switch 42114101 Rev.1 79 /
-
 1
1 -
2
-
3
-
4
-
5
-
6
-
7
-
8
-
9
-
10
-
11
-
12
-
13
-
14
-
15
-
16
-
17
-
18
-
19
-
20
-
21
-
22
-
23
-
24
-
25
-
26
-
27
-
28
-
29
-
30
-
31
-
32
-
33
-
34
-
35
-
36
-
37
-
38
-
39
-
40
-
41
-
42
-
43
-
44
-
45
-
46
-
47
-
48
-
49
-
50
-
51
-
52
-
53
-
54
-
55
-
56
-
57
-
58
-
59
-
60
-
61
-
62
-
63
-
64
-
65
-
66
-
67
-
68
-
69
-
70
-
71
-
72
-
73
-
 74
74 -
 75
75 -
 76
76 -
 77
77 -
 78
78 -
 79
79 -
 80
80 -
 81
81 -
 82
82 -
 83
83 -
 84
84 -
85
-
86
-
87
-
88
-
89
-
90
-
91
-
92
-
93
-
94
-
95
-
96
-
97
-
98
-
99
-
100
-
101
-
102
-
103
-
104
-
105
-
106
-
107
-
108
-
109
-
110
-
111
-
112
-
113
-
114
-
115
-
116
-
117
-
118
-
119
-
120
-
121
-
122
-
123
-
124
-
125
-
126
-
127
-
128
-
129
-
130
-
131
-
132
-
133
-
134
-
135
 |
 |

42114101
Rev.1
79 /
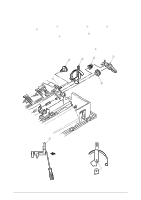
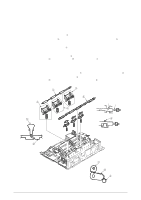
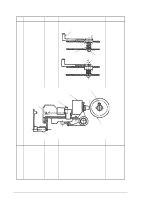
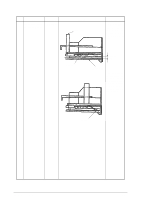
3.3.22 Switch Lever
(1)
Remove the upper cover (see 3.3.4 (1) – (5)).
(2)
Remove the Control/Power Supply Board. (see 3.3.15).
(3)
Remove the change lever and gears (see 3.3.17).
(4)
Remove the paper pan (see 3.3.19).
(5)
Remove the rear pressure assy (see 3.3.21).
(6)
Pull the Switch Lever toward you and remove it upward.
(7)
To install, follow the removal step in the reverse order.
Remark on assembly:
(1)
At the time of the Switch Lever assembly, make sure that the Micro switch on the
Power Supply Board works properly.
Micro switch
Switch lever
Switch lever