Oki ML591 Product Update - Page 13
Go to the Add Printer Wizard, Automatically detect and install Plug°n°Play printer, Manufacturers, - okidata driver
 |
View all Oki ML591 manuals
Add to My Manuals
Save this manual to your list of manuals |
Page 13 highlights
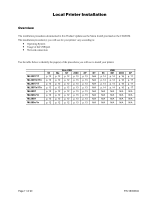
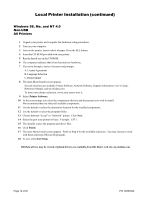
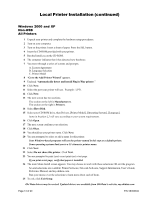
Local Printer Installation (continued) Windows 2000 and XP Non-USB All Printers 1 Unpack your printer and complete the hardware setup procedures. 2 Turn on your computer. 3 Turn on the printer. Insert a sheet of paper. Press the SEL button. 4 Insert the CD-ROM provided with your printer. 5 Run the Install.exe on the CD-ROM. 6 The computer indicates that it has detected new hardware. 7 You move through a series of screens and prompts. A. License Agreement B. Language Selection C. Printer Model 8 "Go to the Add Printer Wizard" appears. 9 Uncheck "Automatically detect and install Plug'n'Play printer." 10 Click Next. 11 Select the port your printer will use. Example: LPT1. 12 Click Next. 13 The next screen has two sections. The section on the left is Manufacturers. The section on the right is Printers. 14 Select Have Disk. 15 Select your CD-ROM drive, then Drivers, [Printer Model], [Operating System], [Language]. Items in brackets [ ] will vary according to your system requirements. 16 Click Open. 17 The next screen confirms your selection. 18 Click Okay. 19 You should see your printer name. Click Next. 20 You are prompted to select or add a name for this printer. Your Windows-based programs will use the printer named in this step as a default printer. Some operating systems limit you to a 31-character printer name. 21 Click Next. 22 Select Do not share this printer. Click Next. 23 You are prompted to print (yes) or not print (no) a test page. If you print a test page, verify that paper is installed. 24 The main Menu Install screen appears. You may choose to work with these selections OR exit the program. Several selections are available: Printer Software, Network Software, Support Information, User's Guide, Reference Manual, and my.okidata.com. Run your mouse over the selections to learn more about each of them. 25 To exit, click Exit Setup. Oki Data drivers may be revised. Updated drivers are available from Oki Data's web site, my.okidata.com Page 13 of 20 P/N 58356302
-
 1
1 -
2
-
3
-
4
-
5
-
6
-
7
-
 8
8 -
 9
9 -
 10
10 -
 11
11 -
 12
12 -
 13
13 -
 14
14 -
 15
15 -
 16
16 -
 17
17 -
 18
18 -
19
-
20
 |
 |