Olympus 226750 STYLUS TOUGH-8000 Instruction Manual (English) - Page 19
Using Shooting Modes
 |
UPC - 050332167872
View all Olympus 226750 manuals
Add to My Manuals
Save this manual to your list of manuals |
Page 19 highlights
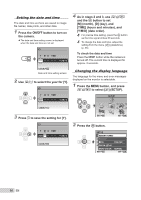
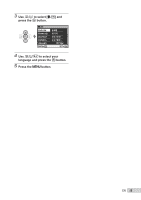
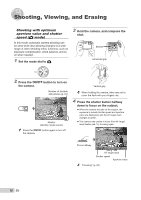
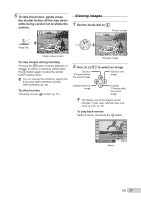
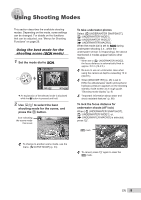
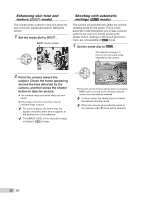
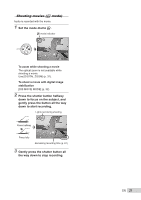
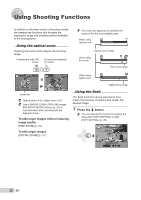
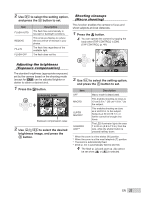
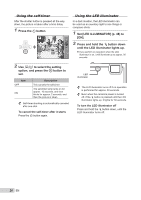
Using Shooting Modes This section describes the available shooting modes. Depending on the mode, some settings can be changed. For details on the functions that can be adjusted, see "Menus for Shooting Functions" on page 29. Using the best mode for the shooting scene (s mode) 1 Set the mode dial to s. PORTRAIT EXIT MENU SET OK ● An explanation of the selected mode is displayed while the E button is pressed and held. 2 Use EF to select the best shooting mode for the scene, and press the o button. Icon indicating the scene mode that is set 12M NORM IN 4 To change to another scene mode, use the menu. [O SCENE MODE] (p. 33) To take underwater photos Select [T UNDERWATER SNAPSHOT], [k UNDERWATER WIDE1], [l UNDERWATER WIDE2]*1, [H UNDERWATER MACRO]. When the mode dial is set to s during underwater shooting (i.e., while the underwater sensor is responding), the above mentioned 4 modes appear before other modes. *1 When set to [l UNDERWATER WIDE2], the focus distance is automatically fixed to approx. 5.0 m (16.4 ft.). Be sure to use an underwater case when using the camera at depths exceeding 10 m (32.8 ft.). When [MANOMETER] (p. 48) is set to [ON], the altitude/water depth (atmospheric/ hydraulic pressure) appears on the shooting standby mode screen as a rough guide. "Shooting mode display" (p. 8) "Important information about water and shock resistant features" (p. 68) To lock the focus distance for underwater shoots (AF lock) When [T UNDERWATER SNAPSHOT], [k UNDERWATER WIDE1], or, [H UNDERWATER MACRO] is selected, press F. ^ mark AFL 12M NORM IN 4 To cancel, press F again to clear the ^ mark. EN 19
-
 1
1 -
2
-
3
-
4
-
5
-
6
-
7
-
8
-
9
-
10
-
11
-
12
-
13
-
 14
14 -
 15
15 -
 16
16 -
 17
17 -
 18
18 -
 19
19 -
 20
20 -
 21
21 -
 22
22 -
 23
23 -
 24
24 -
25
-
26
-
27
-
28
-
29
-
30
-
31
-
32
-
33
-
34
-
35
-
36
-
37
-
38
-
39
-
40
-
41
-
42
-
43
-
44
-
45
-
46
-
47
-
48
-
49
-
50
-
51
-
52
-
53
-
54
-
55
-
56
-
57
-
58
-
59
-
60
-
61
-
62
-
63
-
64
-
65
-
66
-
67
-
68
-
69
-
70
-
71
-
72
-
73
-
74
-
75
-
76
-
77
-
78
-
79
-
80
-
81
-
82
-
83
-
84
-
85
-
86
 |
 |
