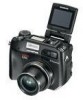
Olympus 5060 C-5060 Wide Zoom Reference Manual (9.6 MB) - Page 67
the same procedure as for, shooting using the viewfinder.
 |
View all Olympus 5060 manuals
Add to My Manuals
Save this manual to your list of manuals |
Page 67 highlights
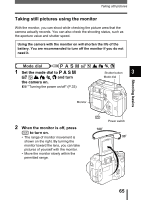
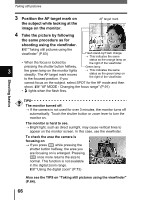
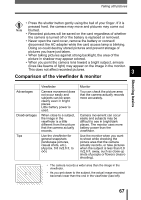
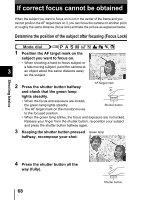
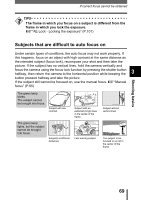
Taking still pictures Shooting basics 3 Position the AF target mark on the subject while looking at the image on the monitor. AF target mark 4 Take the picture by following the same procedure as for shooting using the viewfinder. g"Taking still pictures using the viewfinder" (P.63) Flash stand-by/Flash charge → This indicates the same • When the focus is locked by status as the orange lamp on the right of the viewfinder. pressing the shutter button halfway, Green lamp 3 the green lamp on the monitor lights steadily. The AF target mark moves → This indicates the same status as the green lamp on to the focused position. If you the right of the viewfinder. cannot focus on the subject, select SPOT for the AF mode and then shoot. g"AF MODE - Changing the focus range" (P.91) • # lights when the flash fires. TIPS The monitor turned off. → If the camera is not used for over 3 minutes, the monitor turns off automatically. Touch the shutter button or zoom lever to turn the monitor on. The monitor is hard to see. → Bright light, such as direct sunlight, may cause vertical lines to appear on the monitor screen. In this case, use the viewfinder. To check the area the camera is focusing on → If you press f while pressing the shutter button halfway, the area you are focusing on is enlarged. Pressing f once more returns the size to normal. This function is not available in the digital zoom range. g"Using the digital zoom" (P.73) Also see the TIPS on "Taking still pictures using the viewfinder" (P.64). 66
-
 1
1 -
2
-
3
-
4
-
5
-
6
-
7
-
8
-
9
-
10
-
11
-
12
-
13
-
14
-
15
-
16
-
17
-
18
-
19
-
20
-
21
-
22
-
23
-
24
-
25
-
26
-
27
-
28
-
29
-
30
-
31
-
32
-
33
-
34
-
35
-
36
-
37
-
38
-
39
-
40
-
41
-
42
-
43
-
44
-
45
-
46
-
47
-
48
-
49
-
50
-
51
-
52
-
53
-
54
-
55
-
56
-
57
-
58
-
59
-
60
-
61
-
 62
62 -
 63
63 -
 64
64 -
 65
65 -
 66
66 -
 67
67 -
 68
68 -
 69
69 -
 70
70 -
 71
71 -
 72
72 -
73
-
74
-
75
-
76
-
77
-
78
-
79
-
80
-
81
-
82
-
83
-
84
-
85
-
86
-
87
-
88
-
89
-
90
-
91
-
92
-
93
-
94
-
95
-
96
-
97
-
98
-
99
-
100
-
101
-
102
-
103
-
104
-
105
-
106
-
107
-
108
-
109
-
110
-
111
-
112
-
113
-
114
-
115
-
116
-
117
-
118
-
119
-
120
-
121
-
122
-
123
-
124
-
125
-
126
-
127
-
128
-
129
-
130
-
131
-
132
-
133
-
134
-
135
-
136
-
137
-
138
-
139
-
140
-
141
-
142
-
143
-
144
-
145
-
146
-
147
-
148
-
149
-
150
-
151
-
152
-
153
-
154
-
155
-
156
-
157
-
158
-
159
-
160
-
161
-
162
-
163
-
164
-
165
-
166
-
167
-
168
-
169
-
170
-
171
-
172
-
173
-
174
-
175
-
176
-
177
-
178
-
179
-
180
-
181
-
182
-
183
-
184
-
185
-
186
-
187
-
188
-
189
-
190
-
191
-
192
-
193
-
194
-
195
-
196
-
197
-
198
-
199
-
200
-
201
-
202
-
203
-
204
-
205
-
206
-
207
-
208
-
209
-
210
-
211
-
212
-
213
-
214
-
215
-
216
-
217
-
218
-
219
-
220
-
221
-
222
-
223
-
224
-
225
-
226
-
227
-
228
-
229
-
230
-
231
-
232
-
233
-
234
-
235
-
236
-
237
-
238
-
239
-
240
-
241
-
242
-
243
-
244
-
245
-
246
-
247
-
248
-
249
-
250
-
251
-
252
-
253
-
254
-
255
-
256
-
257
-
258
-
259
-
260
-
261
-
262
-
263
-
264
-
265
-
266
-
267
-
268
-
269
-
270
-
271
-
272
-
273
-
274
-
275
-
276
-
277
-
278
-
279
-
280
-
281
-
282
-
283
-
284
-
285
-
286
-
287
-
288
-
289
 |
 |
