Olympus D595 D-595 Zoom Advanced Manual (English) - Page 24
When to use the monitor and viewfinder
 |
UPC - 050332153332
View all Olympus D595 manuals
Add to My Manuals
Save this manual to your list of manuals |
Page 24 highlights
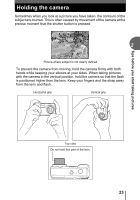
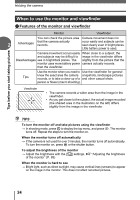
Tips before you start taking pictures Holding the camera When to use the monitor and viewfinder (Features of the monitor and viewfinder Monitor Viewfinder You can check the picture area Camera movement does not 2 Advantages that the camera actually records. occur easily and subjects can be seen clearly even in bright places. Little battery power is used. Camera movement occurs easily When close to a subject, the and subjects may be difficult to image in the viewfinder differs Disadvantages see in bright/dark places. The slightly from the picture that the monitor uses more battery power camera actually records. than the viewfinder. Use the monitor when you need to Use the viewfinder for general Tips know the exact area the camera snapshots, landscape pictures records, or to take a close-up of a and other casual shots. person or flower (macro shooting). Viewfinder • The camera records a wider area than the image in the viewfinder. • As you get closer to the subject, the actual image recorded (the shaded area in the illustration on the left) differs slightly from the image in the viewfinder. TIPS To turn the monitor off and take pictures using the viewfinder → In shooting mode, press Z to display the top menu, and press c. The monitor turns off. Repeat the steps to turn the monitor on. When the monitor turns off automatically → If the camera is not used for over 3 minutes, the monitor turns off automatically. To turn the monitor on, press # or the shutter button. To adjust the brightness of the monitor → Adjust the brightness with the [s] settings. g"Adjusting the brightness of the monitor" (P. 89) When the monitor is hard to see → Bright light, such as direct sunlight, may cause vertical lines (smears) to appear on the image in the monitor. This does not affect recorded pictures. 24
-
 1
1 -
2
-
3
-
4
-
5
-
6
-
7
-
8
-
9
-
10
-
11
-
12
-
13
-
14
-
15
-
16
-
17
-
18
-
 19
19 -
 20
20 -
 21
21 -
 22
22 -
 23
23 -
 24
24 -
 25
25 -
 26
26 -
 27
27 -
 28
28 -
 29
29 -
30
-
31
-
32
-
33
-
34
-
35
-
36
-
37
-
38
-
39
-
40
-
41
-
42
-
43
-
44
-
45
-
46
-
47
-
48
-
49
-
50
-
51
-
52
-
53
-
54
-
55
-
56
-
57
-
58
-
59
-
60
-
61
-
62
-
63
-
64
-
65
-
66
-
67
-
68
-
69
-
70
-
71
-
72
-
73
-
74
-
75
-
76
-
77
-
78
-
79
-
80
-
81
-
82
-
83
-
84
-
85
-
86
-
87
-
88
-
89
-
90
-
91
-
92
-
93
-
94
-
95
-
96
-
97
-
98
-
99
-
100
-
101
-
102
-
103
-
104
-
105
-
106
-
107
-
108
-
109
-
110
-
111
-
112
-
113
-
114
-
115
-
116
-
117
-
118
-
119
-
120
-
121
-
122
-
123
-
124
-
125
-
126
-
127
-
128
-
129
-
130
-
131
-
132
-
133
-
134
-
135
-
136
-
137
-
138
-
139
-
140
-
141
-
142
-
143
-
144
-
145
-
146
-
147
-
148
-
149
-
150
-
151
-
152
-
153
-
154
-
155
-
156
 |
 |
