Olympus DM-420 DM-420 Detailed Instructions (English) - Page 28
About Recording
 |
UPC - 807360860875
View all Olympus DM-420 manuals
Add to My Manuals
Save this manual to your list of manuals |
Page 28 highlights
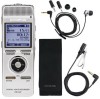
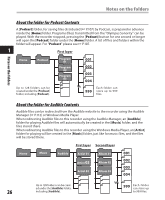
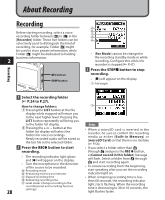
About Recording Recording Before starting recording, select a voice recording folder between [&] to [*] in the [Recorder] folder. These five folders can be selectively used to distinguish the kind of recording; for example, Folder [&] might be used to store private information, while Folder ['] might be dedicated to holding business information. 2 REC button STOP button a b c d e • [Rec Mode] cannot be changed in the recording standby mode or while recording. Configure this while the recorder is stopped (☞ P.47). 3 Press the STOP4 button to stop recording. • [4] will appear on the display. f File length Recording 1 Select the recording folder (☞ P.24 to P.27). How to change folders: f 1 Pressing the LIST button at the file display while stopped will return you to the next higher level. Pressing the LIST button repeatedly will bring you to the folder list display. 2 Pressing the + or − button at the folder list display will select the folders for voice recordings. Newly recorded audio will be saved as the last file in the selected folder. Notes • When a microSD card is inserted in the recorder, be sure to confirm the recording media as either [Built-in Memory] or [microSD Card] so that there is no mistake (☞ P.54). 2 Press the RECs button to start • If you select a folder other than A recording. through E and press the REC s button, • The recording indicator light glows and [s] will appear on the display. • Turn the microphone in the direction of the source to be recorded. a Recording mode a [Cannot record in this folder] message will flash. Select a folder from A through E and start recording again. • To ensure recording from the beginning, start speaking after you see the recording b Remaining memory bar indicator indicator light on. c Elapsed recording time • When remaining recording time is less d Remaining recording time e Level meter (change according to the recording level and recording function 28 settings) than 60 seconds, the recording indicator light starts flashing. When the recording time is decreasing to 30 or 10 seconds, the light flashes faster.
-
 1
1 -
2
-
3
-
4
-
5
-
6
-
7
-
8
-
9
-
10
-
11
-
12
-
13
-
14
-
15
-
16
-
17
-
18
-
19
-
20
-
21
-
22
-
 23
23 -
 24
24 -
 25
25 -
 26
26 -
 27
27 -
 28
28 -
 29
29 -
 30
30 -
 31
31 -
 32
32 -
 33
33 -
34
-
35
-
36
-
37
-
38
-
39
-
40
-
41
-
42
-
43
-
44
-
45
-
46
-
47
-
48
-
49
-
50
-
51
-
52
-
53
-
54
-
55
-
56
-
57
-
58
-
59
-
60
-
61
-
62
-
63
-
64
-
65
-
66
-
67
-
68
-
69
-
70
-
71
-
72
-
73
-
74
-
75
-
76
-
77
-
78
-
79
-
80
-
81
-
82
-
83
-
84
-
85
-
86
-
87
-
88
-
89
-
90
-
91
-
92
-
93
-
94
-
95
-
96
-
97
-
98
-
99
-
100
-
101
-
102
-
103
-
104
-
105
-
106
-
107
-
108
-
109
-
110
-
111
-
112
-
113
-
114
-
115
-
116
-
117
-
118
-
119
-
120
-
121
-
122
-
123
-
124
-
125
-
126
-
127
-
128
 |
 |
