Olympus E420 E-420 Instruction Manual (English) - Page 106
Additional shooting tips and information, PIXEL MAPPING] - shutter count
 |
UPC - 005332163898
View all Olympus E420 manuals
Add to My Manuals
Save this manual to your list of manuals |
Page 106 highlights
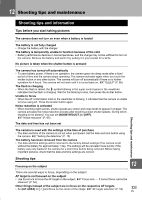
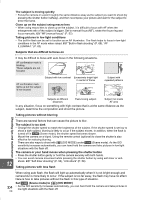
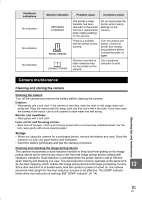
Taking pictures of a subject against backlight If the background is too bright compared to the subject, the exposure will be affected at the bright parts and the subject will appear darker. This is because the camera determines the exposure from the brightness of the whole screen. • Set [METERING] to [n] (spot metering) to measure the exposure of the subject in the center of the picture. To change the composition, place the subject in the center of the picture. While holding down the AEL/AFL button, change the composition and press the shutter button. g"Changing the metering mode" (P. 47) • Activate the flash, set the flash mode to [#] (fill-in flash) and shoot the picture. You can shoot a subject against backlight without the face of the subject appearing dark. [#] (fill-in flash) is used for shooting against backlight and under fluorescent and other artificial lighting. g"Flash mode setting" (P. 66) Image turns out too bright or too dark When taking pictures in S mode or A mode, the displayed shutter speed or aperture setting may blink. A blinking display means that the correct exposure cannot be obtained. If you take the picture as is, the picture will appear too bright or too dark. If that happens, change the aperture setting or shutter speed. g"Aperture priority shooting" (P. 43), "Shutter priority shooting" (P. 44), "Exposure warning display" (P. 117) Unknown bright dot(s) appear on the subject in the picture taken This may be due to stuck pixel(s) on the image pickup device. Perform [PIXEL MAPPING]. If the problem persists, repeat pixel mapping a few times. g"Pixel mapping k Checking the image processing functions" (P. 112) Additional shooting tips and information Increasing the number of pictures that can be taken The captured image will be recorded on the card. The following ways describe how to record more images. • Change the record mode. The size of an image varies with the record mode. When you are not sure of the available card capacity, change the image mode and shoot the picture. The smaller the image size and the higher the compression, the smaller the size of the image becomes. To make the file size small, combine the image size and compression rate and register it with [K SET]. You can further reduce the number of pixels by setting [PIXEL COUNT] to fewer pixels for image size [X] or [W]. g"Selecting the record mode" (P. 59), "K SET" (P. 88), "PIXEL COUNT" (P. 88) • Use a card with large capacity. The number of recordable images varies with the capacity of the card. Use a card with large capacity. Using a new card 12 If you use a non-Olympus card or a card used for another application, such as for a computer, the message [CARD ERROR] is displayed. To use this card with this camera, use the [FORMAT] function to format the card. g"Formatting the card" (P. 113) 106 EN Shooting tips and maintenance
-
 1
1 -
2
-
3
-
4
-
5
-
6
-
7
-
8
-
9
-
10
-
11
-
12
-
13
-
14
-
15
-
16
-
17
-
18
-
19
-
20
-
21
-
22
-
23
-
24
-
25
-
26
-
27
-
28
-
29
-
30
-
31
-
32
-
33
-
34
-
35
-
36
-
37
-
38
-
39
-
40
-
41
-
42
-
43
-
44
-
45
-
46
-
47
-
48
-
49
-
50
-
51
-
52
-
53
-
54
-
55
-
56
-
57
-
58
-
59
-
60
-
61
-
62
-
63
-
64
-
65
-
66
-
67
-
68
-
69
-
70
-
71
-
72
-
73
-
74
-
75
-
76
-
77
-
78
-
79
-
80
-
81
-
82
-
83
-
84
-
85
-
86
-
87
-
88
-
89
-
90
-
91
-
92
-
93
-
94
-
95
-
96
-
97
-
98
-
99
-
100
-
 101
101 -
 102
102 -
 103
103 -
 104
104 -
 105
105 -
 106
106 -
 107
107 -
 108
108 -
 109
109 -
 110
110 -
 111
111 -
112
-
113
-
114
-
115
-
116
-
117
-
118
-
119
-
120
-
121
-
122
-
123
-
124
-
125
-
126
-
127
-
128
-
129
-
130
-
131
-
132
-
133
-
134
-
135
-
136
-
137
-
138
-
139
-
140
 |
 |