Olympus SP 310 SP-310 Advanced Manual (English) - Page 75
Changing the monitor display (DISP./GUIDE
 |
UPC - 050332156210
View all Olympus SP 310 manuals
Add to My Manuals
Save this manual to your list of manuals |
Page 75 highlights
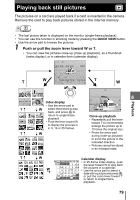
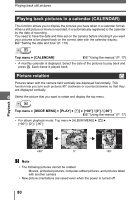
Changing the monitor display (y) 1 Take the picture. • When recording starts, aim the camera microphone at the source of the sound you want to record. Microphone TIPS • H is displayed when still pictures with sound are played back. During playback, sound is output from the speaker. The volume can be adjusted. g"Setting camera sounds (8/BEEP/SHUTTER SOUND/VOLUME)" (P. 112) • Sound can be added later to still pictures. Recorded sound can also be re- recorded. g"Adding sound to still pictures" (P. 91) 5 Note • If the microphone is farther than 1 m (3.3 ft.) from the subject, sound may not be recorded properly. • Pictures cannot be taken during sound recording. • Recording sound with still pictures is not available during sequential shooting, panorama shooting, or timelapse. • Sound recording may also pick up camera noises, such as button operations, shutter movement, etc. • Sound recording may not be possible if there is insufficient space in the internal memory or the card. Changing the monitor display (DISP./GUIDE) This function displays histograms and lines that help you to compose your pictures. You can hide the shooting information from being displayed on the monitor and turn off the monitor. Additional shooting functions 75
-
 1
1 -
2
-
3
-
4
-
5
-
6
-
7
-
8
-
9
-
10
-
11
-
12
-
13
-
14
-
15
-
16
-
17
-
18
-
19
-
20
-
21
-
22
-
23
-
24
-
25
-
26
-
27
-
28
-
29
-
30
-
31
-
32
-
33
-
34
-
35
-
36
-
37
-
38
-
39
-
40
-
41
-
42
-
43
-
44
-
45
-
46
-
47
-
48
-
49
-
50
-
51
-
52
-
53
-
54
-
55
-
56
-
57
-
58
-
59
-
60
-
61
-
62
-
63
-
64
-
65
-
66
-
67
-
68
-
69
-
 70
70 -
 71
71 -
 72
72 -
 73
73 -
 74
74 -
 75
75 -
 76
76 -
 77
77 -
 78
78 -
 79
79 -
 80
80 -
81
-
82
-
83
-
84
-
85
-
86
-
87
-
88
-
89
-
90
-
91
-
92
-
93
-
94
-
95
-
96
-
97
-
98
-
99
-
100
-
101
-
102
-
103
-
104
-
105
-
106
-
107
-
108
-
109
-
110
-
111
-
112
-
113
-
114
-
115
-
116
-
117
-
118
-
119
-
120
-
121
-
122
-
123
-
124
-
125
-
126
-
127
-
128
-
129
-
130
-
131
-
132
-
133
-
134
-
135
-
136
-
137
-
138
-
139
-
140
-
141
-
142
-
143
-
144
-
145
-
146
-
147
-
148
-
149
-
150
-
151
-
152
-
153
-
154
-
155
-
156
-
157
-
158
-
159
-
160
-
161
-
162
-
163
-
164
-
165
-
166
-
167
-
168
-
169
-
170
-
171
-
172
-
173
-
174
-
175
-
176
-
177
-
178
-
179
-
180
-
181
-
182
-
183
-
184
-
185
-
186
-
187
-
188
-
189
-
190
-
191
-
192
-
193
-
194
-
195
 |
 |
