Onkyo TA-RW255 Owner Manual - Page 5
System connections, Power connections - ta manual
 |
UPC - 751398006609
View all Onkyo TA-RW255 manuals
Add to My Manuals
Save this manual to your list of manuals |
Page 5 highlights
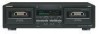
TA-RW255_En.book Page 5 Tuesday, April 19, 2005 4:36 PM System connections • Do not plug in the AC power cord until all other connections have been made. • On each pair of input or output jacks, the lower jack (marked R) corresponds to the right channel, and the upper jack (marked L) to the left channel. Refer to the amplifier's instruction manual for further information on connections. IN (REC) OUT (PLAY) L L R R REMOTE CONTROL To AC outlet Plug the AC power cord into a wall outlet. Connecting to an amplifier Connect the tape deck LINE IN jacks to the TAPE REC jacks on the rear panel of the amplifier and the tape deck LINE OUT jacks to the amplifier TAPE PLAY jacks. Refer to the amplifier's instruction manual for further information on connections. L RL R (REC)(PLAY) Amplifier See "Connecting Onkyo components for z operation" on page 12. Power connections 1 2 North American models STANDBY/ON STANDBY 3 non-North American models STANDBY/ON MAIN POWER STANDBY ON OFF non-North American models STANDBY/ON MAIN POWER STANDBY ON OFF Switching power on For North American model: 1. Plug the AC power cord into a wall outlet. The STANDBY indicator will light. 2. Press the STANDBY/ON button. The STANDBY indicator will go out and the display will light. For non-North American model: 1. Plug the AC power cord into a wall outlet. 2. Press the MAIN POWER switch. The STANDBY indicator will light. 3. Press the STANDBY/ON button. The STANDBY indicator will go out and the display will light. • Pressing the a or s button of either Deck A or Deck B when the unit is in standby status will also cause the display to light and playback will start. • If the tape deck is plugged into the amplifier's AC outlet, the amplifier's AC power cord must be plugged into a wall outlet and its power switched on before the tape deck can operate. 5
-
 1
1 -
 2
2 -
 3
3 -
 4
4 -
 5
5 -
 6
6 -
 7
7 -
 8
8 -
 9
9 -
 10
10 -
 11
11 -
12
-
13
-
14
-
15
-
16
 |
 |
