Onkyo TA-RW255 Owner Manual - Page 6
To play a tape - ta tape
 |
UPC - 751398006609
View all Onkyo TA-RW255 manuals
Add to My Manuals
Save this manual to your list of manuals |
Page 6 highlights
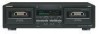
TA-RW255_En.book Page 6 Tuesday, April 19, 2005 4:36 PM To play a tape • Check once again that all connections have been completed exactly as indicated in the connections diagram and then plug in the AC power cord. • After turning the power on, the display illuminates and the g PAUSE indicator flashes (about 5 seconds). While the indicator is flashing, no operation can be performed. • This deck holds two cassettes at once. Both Deck A and Deck B are capable of auto-reverse playback; Deck B can also record. • Tapes can be played back using either Deck A or Deck B. Follow the procedure on Deck A or B. (Deck A is pictured.) 2 13 4 ONKYO 1 EJECT 5 ONKYO 2 3 DOLBY NR 4 REVERSE MODE 5 6 Listening to a tape 1. Press the EJECT button to open the cassette holder. 2. Insert a cassette. • The side of the cassette with the exposed tape should be facing downward. 3. Set the Dolby NR by pressing the DOLBY NR button repeatedly until the proper Dolby NR indicator (OFF, B or C) turns on. • Select the same noise reduction system that was used when the cassette was recorded. For instance, tapes recorded using Dolby B NR should be played back with Dolby B NR. 4. Set the Reverse Mode by pressing the REVERSE MODE button repeatedly until the desired mode is displayed. ( v ) one side: Only one side of the tape is played back. ( b ) repeat: Both sides of the tape are played back repeatedly eight times or until the e button is pressed. 5. Start playback. • Press the a or s button depending on which side of the cassette you wish to listen to. s : Playback starts from the front side. a : Playback starts from the reverse side. • The auto-stop mechanism will automatically stop the tape (depending on the tape transport mode) if a tape is played through to the end. Stopping playback Press the e button.
-
 1
1 -
 2
2 -
 3
3 -
 4
4 -
 5
5 -
 6
6 -
 7
7 -
 8
8 -
 9
9 -
 10
10 -
 11
11 -
 12
12 -
13
-
14
-
15
-
16
 |
 |
