Onkyo TX-NR696 Owners Manual - English - Page 128
Network
 |
View all Onkyo TX-NR696 manuals
Add to My Manuals
Save this manual to your list of manuals |
Page 128 highlights
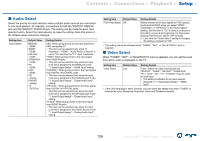
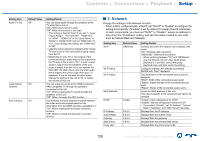
Contents ≫ Connections ≫ Playback ≫ Setup ≫ Setting Item Audio TV Out Audio Return Channel Auto Lip Sync Default Value Off Off On Setting Details You can enjoy audio through the speakers of the TV while this unit is on. "On": When this function is used "Off": When this function is not used • This setting is fixed to "Auto" if you set "1. Input/ Output Assign" - "TV Out/OSD" - "HDMI Out" or "HDMI" - "HDMI Out" in the "Quick Menu" to "MAIN" or "MAIN+SUB" and set "HDMI CEC" to "On". If you change this setting, set "HDMI CEC" to "Off". • Listening mode cannot be changed while "Audio TV Out" is set to "On" and audio is being output from the TV. • Depending on your TV or input signal of the connected device, audio may not be output from the TV even if this is set to "On". In such a case, audio is output from the speakers of the unit. • Audio is output from this unit if you operate the MASTER VOLUME dial on this unit when audio that is input to this unit is output from your TV speakers. If you do not want to output audio, change the setting of this unit or TV, or reduce the volume of this unit. You can enjoy the sound of the HDMI-connected ARC-compatible TV through the speakers connected to the unit. "On": When enjoying the TV sound through the speakers of this unit "Off": When not using the ARC function Automatically corrects desynchronization between the video and audio signals based on the information from the HDMI Lip-Sync-compatible TV. "On": When enabling the automatic correction function "Off": When not using the automatic correction function „„2. Network Change the settings of the Network function. • When LAN is configured with a DHCP, set "DHCP" to "Enable" to configure the setting automatically. ("Enable" is set by default) To assign fixed IP addresses to each components, you must set "DHCP" to "Disable", assign an address to this unit in the "IP Address" setting, and set information related to your LAN, such as Subnet Mask and Gateway. Setting Item Wi-Fi Wi-Fi Setup Wi-Fi Status MAC Address DHCP IP Address Subnet Mask Gateway DNS Server Proxy URL Default Value Off(Wired) - Enable 0.0.0.0 0.0.0.0 0.0.0.0 0.0.0.0 - Setting Details Connect the unit to the network via a wireless LAN router. "On": Wireless LAN connection "Off(Wired)": Wired LAN connection • When switching between "On" and "Off(Wired)", stop the Network service. Also, when group playback is in process, cancel the group playback once, and then switch the setting. Configure wireless LAN settings by pressing ENTER with "Start" displayed. The information of the connected access point is displayed. "SSID": SSID of the connected access point. "Signal": Signal strength of the connected access point. "Status": Status of the connected access point. Check the MAC address of this unit. This value is specific to the component and cannot be changed. "Enable": Auto configuration by DHCP "Disable": Manual configuration without DHCP • If you select "Disable", set "IP Address", "Subnet Mask", "Gateway", and "DNS Server" manually. Displays/Sets the IP address. Displays/Sets the subnet mask. Displays/Sets the gateway. Displays/Sets the primary DNS server. Displays/Sets the proxy server URL. 128 Front Panel≫ Rear Panel≫ Remote≫
-
 1
1 -
2
-
3
-
4
-
5
-
6
-
7
-
8
-
9
-
10
-
11
-
12
-
13
-
14
-
15
-
16
-
17
-
18
-
19
-
20
-
21
-
22
-
23
-
24
-
25
-
26
-
27
-
28
-
29
-
30
-
31
-
32
-
33
-
34
-
35
-
36
-
37
-
38
-
39
-
40
-
41
-
42
-
43
-
44
-
45
-
46
-
47
-
48
-
49
-
50
-
51
-
52
-
53
-
54
-
55
-
56
-
57
-
58
-
59
-
60
-
61
-
62
-
63
-
64
-
65
-
66
-
67
-
68
-
69
-
70
-
71
-
72
-
73
-
74
-
75
-
76
-
77
-
78
-
79
-
80
-
81
-
82
-
83
-
84
-
85
-
86
-
87
-
88
-
89
-
90
-
91
-
92
-
93
-
94
-
95
-
96
-
97
-
98
-
99
-
100
-
101
-
102
-
103
-
104
-
105
-
106
-
107
-
108
-
109
-
110
-
111
-
112
-
113
-
114
-
115
-
116
-
117
-
118
-
119
-
120
-
121
-
122
-
 123
123 -
 124
124 -
 125
125 -
 126
126 -
 127
127 -
 128
128 -
 129
129 -
 130
130 -
 131
131 -
 132
132 -
 133
133 -
134
-
135
-
136
-
137
-
138
-
139
-
140
-
141
-
142
-
143
-
144
-
145
-
146
-
147
-
148
-
149
-
150
-
151
-
152
-
153
-
154
-
155
-
156
-
157
-
158
-
159
 |
 |
