Onkyo TX SR506 Owner Manual - Page 67
Advanced Setup, Speaker Setup
 |
UPC - 751398008054
View all Onkyo TX SR506 manuals
Add to My Manuals
Save this manual to your list of manuals |
Page 67 highlights
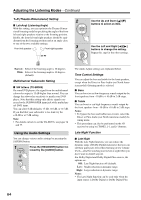
Advanced Setup Speaker Setup 4 This section explains how to check the speaker settings and how to set them manually, which is useful if you change a speaker after performing the automatic speaker setup. Some of the speaker settings are set automatically by the Automatic Speaker Setup function (see page 36). Speaker Configuration 5 These settings are set automatically by the Automatic Speaker Setup function (see page 36). This section explains how to specify which speakers are connected and their sizes. For speakers with a cone diameter larger than 6-1/2 inches (16 cm), specify Large (full band). For those with a smaller diameter, specify Small (default crossover 100Hz). The crossover frequency can be changed on page 68. Cone diameter 6 1 Press the [RECEIVER] button fol- lowed by the [SETUP] button. If you have a TX-SR506, proceed to step 3. 2 (TX-SR576 only) Use the Up and Down [ ]/[ ] buttons to select "2.Speaker Setup," and then press the [ENTER] button. 7 3 Use the Up and Down [ ]/[ ] buttons to select "Sp Config," and then press the [ENTER] but- ton. While the "Subwoofer" setting is selected, use the Left and Right [ ]/[ ] buttons to select Yes or No. Yes: Select if a subwoofer is connected. No: Select if no subwoofer is connected. Use the Down [ ] button to select "Front," and then use the Left and Right [ ]/[ ] buttons to select Small or Large. Small: Select if the front speakers are small. Large: Select if the front speakers are large. Note: • If the Subwoofer setting in step 4 is set to No, this setting is fixed at Large and does not appear. Use the Down [ ] button to select "Center (Cntr)," and then use the Left and Right [ ]/[ ] buttons to select Small, Large, or None. Small: Select if the center speaker is small. Large: Select if the center speaker is large. None: Select if no center speaker is connected. Note: • If the Front setting in step 5 is set to Small, the Large option cannot be selected. Use the Down [ ] button to select "Surround (Surr)," and then use the Left and Right [ ]/[ ] buttons to select Small, Large, or None. Small: Select if the surround speak- ers are small. Large: Select if the surround speak- ers are large. None: Select if no surround speakers are connected. Note: • If the Front setting in step 5 is set to Small, the Large option cannot be selected. 67
-
 1
1 -
2
-
3
-
4
-
5
-
6
-
7
-
8
-
9
-
10
-
11
-
12
-
13
-
14
-
15
-
16
-
17
-
18
-
19
-
20
-
21
-
22
-
23
-
24
-
25
-
26
-
27
-
28
-
29
-
30
-
31
-
32
-
33
-
34
-
35
-
36
-
37
-
38
-
39
-
40
-
41
-
42
-
43
-
44
-
45
-
46
-
47
-
48
-
49
-
50
-
51
-
52
-
53
-
54
-
55
-
56
-
57
-
58
-
59
-
60
-
61
-
 62
62 -
 63
63 -
 64
64 -
 65
65 -
 66
66 -
 67
67 -
 68
68 -
 69
69 -
 70
70 -
 71
71 -
 72
72 -
73
-
74
-
75
-
76
-
77
-
78
-
79
-
80
-
81
-
82
-
83
-
84
-
85
-
86
-
87
-
88
-
89
-
90
-
91
-
92
-
93
-
94
-
95
-
96
 |
 |
