Optoma CinemaX Pro CinemaX_Pro_SmartFIT_Installation_Guide_20191001 v2 - Page 8
pattern as a guide.
 |
View all Optoma CinemaX Pro manuals
Add to My Manuals
Save this manual to your list of manuals |
Page 8 highlights
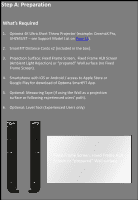
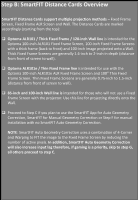
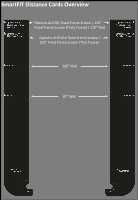
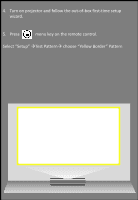
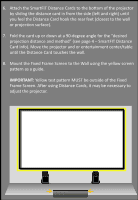
6. Attach the SmartFIT Distance Cards to the bottom of the projector by sliding the distance card in from the side (left and right) until you feel the Distance Card hook the rear feet (closest to the wall or projection surface). 7. Fold the card up or down at a 90-degree angle for the "desired projection distance and method" (see page 4 - SmartFIT Distance Card Info). Move the projector and or entertainment center/table until the Distance Card touches the wall. 8. Mount the Fixed Frame Screen to the Wall using the yellow screen pattern as a guide. IMPORTANT: Yellow test pattern MUST be outside of the Fixed Frame Screen. After using Distance Cards, it may be necessary to adjust the projector.
-
 1
1 -
2
-
 3
3 -
 4
4 -
 5
5 -
 6
6 -
 7
7 -
 8
8 -
 9
9 -
 10
10 -
 11
11 -
 12
12 -
 13
13 -
14
-
15
-
16
-
17
-
18
-
19
 |
 |

6.
Attach the SmartFIT Distance Cards to the bottom of the projector
by sliding the distance card in from the side (left and right) until
you feel the Distance Card hook the rear feet (closest to the wall
or projection surface).
7.
Fold the card up or down at a 90-degree angle for the “desired
projection distance and method” (see page 4 – SmartFIT Distance
Card Info). Move the projector and or entertainment center/table
until the Distance Card touches the wall.
8.
Mount the Fixed Frame Screen to the Wall using the yellow screen
pattern as a guide.
IMPORTANT:
Yellow test pattern MUST be outside of the Fixed
Frame Screen. After using Distance Cards, it may be necessary to
adjust the projector.