Optoma HD-3000 User Manual - Page 52
Output Resolution Selection
 |
View all Optoma HD-3000 manuals
Add to My Manuals
Save this manual to your list of manuals |
Page 52 highlights
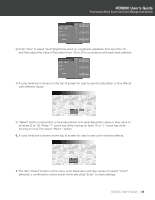
HD3000 User's Guide Professional Video Scaler and Color Management System Note: Not all displays or projectors are capable of receiving and displaying their complete list of resolutions. Please refer to the documentation that came with your projector or display for the exact compatibility match. Certain versions of the HD3000 have been factory preset for a single output range. Output Resolution Selection HD3000 can use Menu to change the desired output resolution. 1. Press the "Menu" button on the remote to show the Menu. 2. Use "h", "i" arrow keys to select SYSTEM category, press "Enter" or "g" key to enter this adjustment category 3. Use "h", "i" arrow keys to select the "Output Resolution" item (as shown) 4. Press "Enter" key or "g" key to enter this item. The Menu disappears and a sub menu is shown (as shown below). 5. Use "h", "i", "f", "g" arrow keys to locate the desired output resolution and press "Enter" to decide the resolution. 6. If the connected device/display can't support the user-selected output resolution, then after a few seconds, the option bars moves back to the original output resolution. 7. Once the user selects and decides an output resolution, a confirmation notice is shown. Enter "Yes" or "Cancel" to adopt the new selected output resolution, or cancel to return to the original output resolution. HD3000 User's Guide 52
-
 1
1 -
2
-
3
-
4
-
5
-
6
-
7
-
8
-
9
-
10
-
11
-
12
-
13
-
14
-
15
-
16
-
17
-
18
-
19
-
20
-
21
-
22
-
23
-
24
-
25
-
26
-
27
-
28
-
29
-
30
-
31
-
32
-
33
-
34
-
35
-
36
-
37
-
38
-
39
-
40
-
41
-
42
-
43
-
44
-
45
-
46
-
 47
47 -
 48
48 -
 49
49 -
 50
50 -
 51
51 -
 52
52 -
 53
53 -
 54
54 -
 55
55 -
 56
56 -
 57
57 -
58
-
59
-
60
-
61
-
62
 |
 |
