Optoma ZW212ST User's Manual - Page 73
Using the OPS Menu, Show Login Code, Web Admin, Search Server, Projection Quality, Projection Source
 |
View all Optoma ZW212ST manuals
Add to My Manuals
Save this manual to your list of manuals |
Page 73 highlights
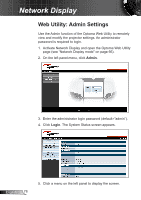
Network Display Using the OPS Menu Click to display the application menu. To use the "Virtual Extended Screen", download the driver first from open the Optoma Web Utility page. Click your computer operating system to start the download. ►► Show Login Code: Click to display the login code of the projector on the upper left corner of the screen for 10 seconds. ►► Web Admin: Opens Optoma web utility (see "Open Optoma Web Utility" on page 67. ►► Search Server: Click to search and connect to the projector. ►► Projection Quality: Select the projection quality: "Normal" for faster projection or "Best" for better quality but slower speed. ►► Projection Source: Select "Main Screen" to project the computer desktop or the "Virtual Extended Screen". ►► Send Audio to Display: Select "Yes" to route the audio output to the projetor. The audio driver must be installed to use this feature. ►► Connection Profile: Select "Save current as" to save the current connection settings as a profile for later use or select "Manage profile" to use or edit an existing profile. ►► Auto WiFi Connect: Check to enable auto WiFi discovery and connection to the projector. 73 English
-
 1
1 -
2
-
3
-
4
-
5
-
6
-
7
-
8
-
9
-
10
-
11
-
12
-
13
-
14
-
15
-
16
-
17
-
18
-
19
-
20
-
21
-
22
-
23
-
24
-
25
-
26
-
27
-
28
-
29
-
30
-
31
-
32
-
33
-
34
-
35
-
36
-
37
-
38
-
39
-
40
-
41
-
42
-
43
-
44
-
45
-
46
-
47
-
48
-
49
-
50
-
51
-
52
-
53
-
54
-
55
-
56
-
57
-
58
-
59
-
60
-
61
-
62
-
63
-
64
-
65
-
66
-
67
-
 68
68 -
 69
69 -
 70
70 -
 71
71 -
 72
72 -
 73
73 -
 74
74 -
 75
75 -
 76
76 -
 77
77 -
 78
78 -
79
-
80
-
81
-
82
-
83
-
84
-
85
-
86
-
87
-
88
-
89
-
90
-
91
-
92
-
93
-
94
-
95
-
96
-
97
-
98
-
99
-
100
-
101
-
102
-
103
-
104
-
105
-
106
-
107
-
108
-
109
-
110
-
111
-
112
-
113
-
114
-
115
-
116
-
117
-
118
 |
 |
