Panasonic 1100W Service Manual - Page 21
Troubleshooting Guide - inverter microwave
 |
UPC - 074000617384
View all Panasonic 1100W manuals
Add to My Manuals
Save this manual to your list of manuals |
Page 21 highlights
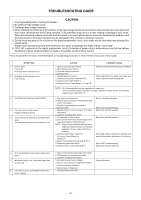
TROUBLESHOOTING GUIDE CAUTION 1. Check grounding before checking for trouble. 2. Be careful of high voltage circuit. 3. Discharge high voltage capacitor. 4. When checking the continuity of the switches or the high voltage transformer,disconnect one lead wire from these parts and then check continuity with the AC plug removed. To do otherwise may result in a false reading or damage to your meter. When disconnecting a plastic connector from a terminal, you must hold the plastic connector instead of the lead wire and then disconnect it, otherwise lead wire may be damaged or the connector cannot be removed. 5. Do not touch any parts of the circuitry on the digital programmer circuit, since static electric discharge may damage this control panel. Always touch yourself to ground while working on this panel to discharge any static charge in your body. 6. 120V AC is present on the digital programmer circuit (Terminals of power relay's and primary circuit of low voltage transformer). When troubleshooting, be cautious of possible electrical shock hazard. First of all operate the microwave oven following the correct operating procedures in order to find the exact cause of any trouble. SYMPTOM 1. Oven is dead. Fuse is OK. No display and no operation at all. 2. No display and no operation at all. Fuse is blown. 3. Oven does not accept key input(Program) 4. Fan motor turn on when oven is plugged in with door closed. 5. Timer starts count down but no microwave oscillation. (No heat while oven lamp and fan motor turn on) CAUSE 1. Open or loose lead wire harness 2. Open thermal cutout (Cavity) 3. Open low voltage transformer 4. Defective DPC 1. Shorted lead wire harness 2. Defective primary latch switdh (NOTE 1) 3. Defective short switch (NOTE 1) 4. Defective Inverter Power Supply (U) (Page 18) CORRECTIONS Check fan motor when thermal cutout is defective. Check adjustment of primary, secondary latch switch and short switch including door. NOTE 1: All of these switches must be replaced at the same time. Check continuity of power relay (RY1)'s contacts (between 1 and 2) and if it has continuity, replace power relay B (RY-1)'s. 1. Key input is not insequence 2. Open or loose connection of membrane key pad to DPC (Flat cable) 3. Shorted or open membrane key board 4. Defective DPC 1. Misadjustment or loose wiring of secondary latch switch 2. Defective secondary latch switch 1. Off-alignment of latch switches 2. Open or loose connection of high voltage circuit especially magnetron filament circuit NOTE: Large contact resistance will bring lower magnetron filament voltage and causing magnetron to lower output and/or be intermittent. 3. Defective high voltage component HV Inverter Power Supply (u) Magnetron 4. Open or loose wiring of power relay B (RY-1) 5. Defective primary latch switch 6. Defective DPC or power relay B (RY-1) Refer to operation procedure. Refer to DPC troubleshooting. Adjust door and latch switches. Adjust door and latch switches. Check high voltage component according to component test procedure and replace if it is defective. Refer to DPC troubleshooting Adjust door and latch switches. 6. Oven can program but timer does not start countdown. 7. Microwave output is low. Oven takes longer time to cook food. 8. Fan motor turns on and turntable rotates when door is opened. 1. Open or loose wiring of secondary latch switch 2. Off-alignment of secondary latch switch 3. Defective secondary latch switch 1. Decrease in power source voltage 2. Open or loose wiring of magnetron filament circuit.(Intermittent oscillation) 3. Aging change of magnetron 1. Shorted primary latch switch Consult electrician - 20 -
-
 1
1 -
2
-
3
-
4
-
5
-
6
-
7
-
8
-
9
-
10
-
11
-
12
-
13
-
14
-
15
-
 16
16 -
 17
17 -
 18
18 -
 19
19 -
 20
20 -
 21
21 -
 22
22 -
 23
23 -
 24
24 -
 25
25 -
 26
26 -
27
-
28
-
29
-
30
-
31
-
32
-
33
-
34
-
35
-
36
 |
 |