Panasonic AJHVF21G AJHVF21G User Guide - Page 5
Parts and Their Functions
 |
View all Panasonic AJHVF21G manuals
Add to My Manuals
Save this manual to your list of manuals |
Page 5 highlights
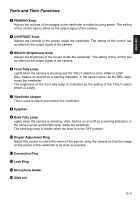
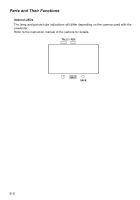
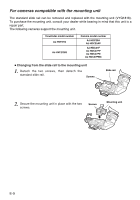
ENGLISH Parts and Their Functions 3 PEAKING Knob Adjusts the outlines of the images in the viewfinder to make focusing easier. The setting of this control has no effect on the output signal of the camera. 4 CONTRAST Knob Adjusts the contrast of the screen inside the viewfinder. The setting of this control has no effect on the output signal of the camera. 5 BRIGHT (Brightness) Knob Adjusts the brightness of the screen inside the viewfinder. The setting of this control has no effect on the output signal of the camera. 6 Front Tally Lamp Lights when the camera is shooting and the TALLY switch is set to HIGH or LOW. Also, flashes on and off as a warning indication, in the same manner as the REC lamp, inside the viewfinder. The brightness of the front tally lamp is controlled by the setting of the TALLY switch (HIGH or LOW). 7 Viewfinder stopper This is used to attach and remove the viewfinder. 8 Eyepiece 9 Back Tally Lamp Lights when the camera is shooting. Also, flashes on and off as a warning indication, in the same manner as the REC lamp inside the viewfinder. The back tally lamp is hidden when the lever is in the OFF position. : Diopter Adjustment Ring Adjust this control to match the vision of the person using the camera so that the image on the screen in the viewfinder is as clear as possible. ; Connection Plug < Lock Ring = Microphone Holder > Slide rail E-4
-
 1
1 -
 2
2 -
 3
3 -
 4
4 -
 5
5 -
 6
6 -
 7
7 -
 8
8 -
 9
9 -
 10
10 -
 11
11 -
12
-
13
-
14
-
15
-
16
-
17
-
18
-
19
-
20
-
21
-
22
-
23
-
24
-
25
-
26
-
27
-
28
-
29
-
30
-
31
-
32
-
33
-
34
-
35
-
36
-
37
-
38
-
39
-
40
-
41
-
42
-
43
-
44
-
45
-
46
-
47
-
48
-
49
-
50
-
51
-
52
-
53
-
54
-
55
-
56
-
57
-
58
-
59
-
60
-
61
-
62
-
63
-
64
-
65
-
66
-
67
-
68
-
69
-
70
-
71
-
72
-
73
-
74
-
75
-
76
-
77
-
78
-
79
-
80
-
81
-
82
-
83
-
84
-
85
-
86
-
87
-
88
-
89
-
90
-
91
-
92
-
93
-
94
-
95
-
96
-
97
-
98
-
99
-
100
-
101
-
102
-
103
-
104
-
105
-
106
-
107
-
108
-
109
-
110
-
111
-
112
-
113
-
114
-
115
-
116
-
117
-
118
-
119
-
120
 |
 |