Panasonic CF-W7BWNZZJM Operating Instructions - Page 29
Battery, Touch Pad, Recover Pro, Display
 |
UPC - 092281876474
View all Panasonic CF-W7BWNZZJM manuals
Add to My Manuals
Save this manual to your list of manuals |
Page 29 highlights
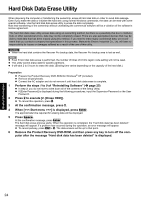
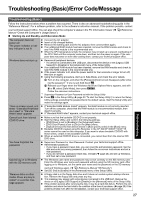
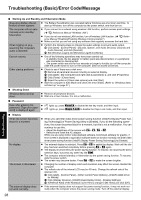
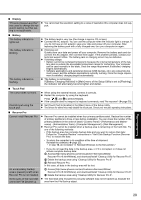
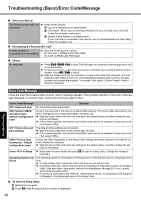
Troubleshooting Useful Information Getting Started Display "Phoenix Always Launcher" was used to change the resolution setting, but that setting is not applicable. Battery The battery indicator is lights red. The battery indicator is blinking. The battery indicator is flashing. Touch Pad The cursor does not work. Cannot input using the touch pad. Recover Pro Cannot install Recover Pro An unnecessary backup area is present (is left) when Recover Pro is not installed. Some parts of the hard disk cannot be File Backed up. You cannot set the resolution setting to a value of resolution this computer does not support. The battery level is very low (the charge is approx. 9% or less). Connect the AC adaptor. You can use the computer when the indicator light is orange. If you do not have an AC adaptor, save your data and power off your computer. After replacing the battery pack with a fully charged one, turn your computer on again. If blinking red: Quickly save your data and power off your computer. Remove the battery pack and disconnect the AC adaptor, then connect them again. If the problem persists, contact your technical support office. The battery pack or charging circuit may be defective. If blinking orange: • Battery cannot be recharged temporarily because the internal temperature of the bat- tery pack is outside the acceptable temperature range for recharging. Your computer can be used normally in this state. Once the range requirement is satisfied, charging begins automatically. • Software applications and peripheral devices (USB devices, etc.) are consuming too much power. Exit the software applications currently running. Once the range requirement is satisfied, charging begins automatically. The battery is recharging. If [Battery Charging Indicator] in [Main] menu of the Setup Utility is set to [Flashing], the indicator will alternately become lighter and darker. When using the external mouse, connect it correctly. Restart the computer by using the keyboard. Press , U, and R to select [Restart]. If the computer does not respond to keyboard commands, read "No response" ( page 30). Set [Touch Pad] to [Enable] in the [Main] menu of the Setup Utility. The drivers for some mice may disable the touch pad. Check your mouse's operating instructions. Recover Pro cannot be installed when four primary partitions exist. Reduce the number of primary partitions to three or less before installation. You can check the number of the primary partitions in the order of [start] - [Control Panel] - [Performance and Maintenance] - [Administrative Tools] - [Computer Management] - [Disk Management]. Recover Pro cannot be installed when a backup area is remaining on the hard disk. Try one of the following methods: • If the backup area has complete backup data and you want to restore that data: Follow the "Complete Restore" instructions in "Hard Disk Backup Function (Recover Pro)" to restore the data. • To return the computer to its condition at the time of shipment: Reinstall the software ( page 25). • In step 12, do not select "3. Reinstall Windows to the first partition." • If you do not need the data in the backup area, or if it is corrupted, or if does not include complete backup data: A Access [http://www.phoenix.com/en/Customer+Services/Utilities/ Recover+Pro+6.htm#Where], and download/install "Cleanup Utility for Recover Pro 6". B Delete the backup area using "Cleanup Utility for Recover Pro 6". C Reinstall Recover Pro. In this case, all data in the backup area will be lost. A Access [http://www.phoenix.com/en/Customer+Services/Utilities/ Recover+Pro+6.htm#Where], and download/install "Cleanup Utility for Recover Pro 6". B Delete the backup area using "Cleanup Utility for Recover Pro 6". The hard disk area encrypted by security software may not be backed up. Exclude the area from the File Backup object. Appendix 29
-
 1
1 -
2
-
3
-
4
-
5
-
6
-
7
-
8
-
9
-
10
-
11
-
12
-
13
-
14
-
15
-
16
-
17
-
18
-
19
-
20
-
21
-
22
-
23
-
 24
24 -
 25
25 -
 26
26 -
 27
27 -
 28
28 -
 29
29 -
 30
30 -
 31
31 -
 32
32 -
 33
33 -
 34
34 -
35
-
36
-
37
-
38
-
39
-
40
-
41
-
42
-
43
 |
 |