Panasonic CYTUN153U CYTUN153U User Guide - Page 12
Mounting the Tuner Unit, Connecting the Parking Brake Side Brake Connection Lead
 |
View all Panasonic CYTUN153U manuals
Add to My Manuals
Save this manual to your list of manuals |
Page 12 highlights
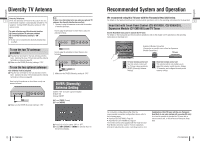
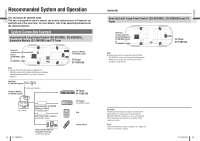
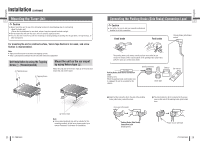
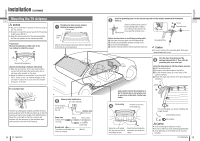
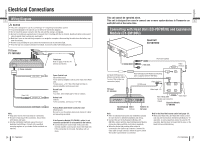
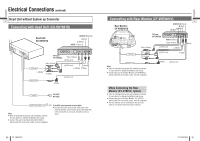
English English Installation (continued) Mounting the Tuner Unit 21 Caution Never mount the unit in any of the following locations to avoid damage due to overheating; • Near the heater port. • Places like the dashboard or rear deck, where it may be exposed to direct sunlight. Do not mount the unit near the door, where it could be exposed to rain. You run the risk of interfering with the mounting or causing damage by drilling into the gas tank, a wiring harness, or other component. For mounting the unit on inclined surface, Velcro tape fixation is too weak, and screw fixation is recommended. Note: Apply an anticorrosive to the holes and tapping screws. Keep a safe distance between the unit and other electronic equipment. Unit Installation by using the Tapping Screw . (Recommended) Tapping Screw Mount the unit on the car carpet by using Velcro tape . Attach the seal side of the Velcro Tape to the unit, then mount the unit on the carpet. Tapping Screw 22 CY-TUN153U Velcro Tape Note: Some carpet materials may not be suitable for this mounting method. In this case, please contact your nearest Panasonic Servicenter for installation. Connecting the Parking Brake (Side Brake) Connection Lead 22 Caution For safety, be sure to ask your nearest professional installer to do this connection. Hand brake Foot brake Parking brake (side brake) switch The parking brake (side brake) switch position varies with the car model. For details on the exact location of the parking brake (side brake) switch in your car, contact your dealer. Parking Brake (Side Brake) Connection Lead (Bright green) When the parking brake (side brake) lever is engaged, the unit is grounded by the chassis. Clip connector Battery Car chassis Brake light Attach a Clip Connector to the end of the parking brake (side brake) connection lead. Come up to this point. The Clip Connector is connected to the power source side lead of the parking brake (side brake) lever. Parking Brake (Side Brake) Connection Lead (Bright green) Power source side lead CY-TUN153U 23
-
 1
1 -
2
-
3
-
4
-
5
-
6
-
 7
7 -
 8
8 -
 9
9 -
 10
10 -
 11
11 -
 12
12 -
 13
13 -
 14
14 -
 15
15 -
 16
16 -
 17
17 -
18
-
19
-
20
-
21
-
22
-
23
-
24
-
25
-
26
-
27
-
28
-
29
-
30
-
31
-
32
-
33
-
34
-
35
-
36
-
37
-
38
-
39
-
40
-
41
-
42
-
43
-
44
-
45
-
46
-
47
-
48
-
49
-
50
-
51
-
52
 |
 |
