Panasonic DMRE500 DMRE500 User Guide - Page 12
STEP 2 SETTING UP THE TV GUIDE ON SCREEN SYSTEM, Press, DVD POWER]., Following the on-screen messages
 |
View all Panasonic DMRE500 manuals
Add to My Manuals
Save this manual to your list of manuals |
Page 12 highlights
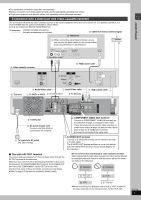
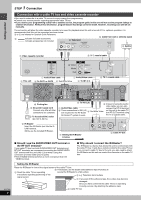
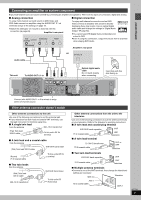
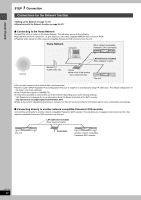
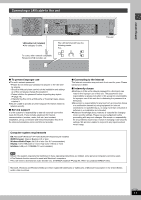
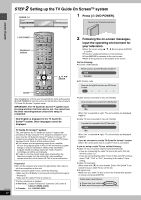
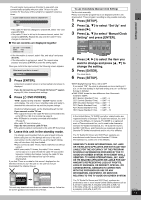
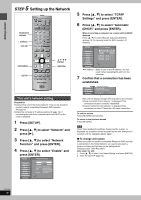
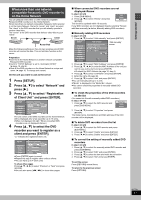
2 STEP Setting up the TV Guide On ScreenTM system POWER Í/I POWER SD CARD PC CARD EJECT HDD OPEN/CLOSE TIME SLIP HDD DVD SD PC DRIVE SELECT /x1.3 DVD 1 Press [Í DVD POWER]. Welcome to Your TV Guide On Screen System! Getting started Í DVD POWER Numbered buttons DVD POWER TV POWER INPUT SELECT TV/VIDEO CH VOLUME HDD 1 4 DVD 23 56 SD/PC PAGE CH AUDIO 789 CANCEL VCR Plus+ CM SKIP 0 SKIP SLOW/SEARCH STOP PAUSE PLAY/x1.3 DIRECT NAVIGATOR FUNCTIONS TOP MENU SUB MENU ENTER RETURN 3,4,2,1 ENTER PROG/CHECK DISPLAY TIME SLIP TV GUIDE SETUP SETUP ERASE REC MODE REC Info DUBBING CHAPTER STATUS After plugging the unit into your household AC outlet and pressing [Í DVD POWER] to turn the unit on for the first time, the unit starts TV Guide On ScreenTM system setup. IMPORTANT: The TV Guide On ScreenTM system must be setup whether it is then used or not. You cannot use the timer recording feature unless this setup is completed. Only English is displayed in the TV Guide On ScreenTM system. Other languages cannot be displayed. TV Guide On ScreenTM system This unit features the TV Guide On ScreenTM system that provides an 8-day rolling list of TV programs available in your area. Use the TV Guide On ScreenTM system to choose TV programs and simplify the recording of your favorite TV shows (➡ page 25-29). Best of all this service is free! ≥If you receive your programming solely from a satellite service, the program guide in this unit will not receive program listings or channel information. Without this information, program-based recordings cannot be made. However, recordings can still be set manually. ≥In order to cool the circuits used when downloading the television program list, the cooling fan may sometimes operate when the unit is turned off. This is not a malfunction. RQT7394 12 Preparation ≥Turn on the television and select the appropriate video input to suit the connections to this unit. ≥When using the cable TV box, check the following. -Make sure the IR Blaster is connected and positioned properly (➡ page 8). -Make sure the cable TV box is turned on. If further assistance is needed, In the U.S.A.: Contact Panasonic's Customer Call Center at 1-800-211-PANA (7262). In Canada: Call 1-800-561-5505. 2 Following the on-screen messages, input the operating environment for your television. ≥Move the cursor using [3, 4, 2, 1] and press [ENTER] to confirm. ≥Press the numbered buttons to enter numbers. ≥Press [ENTER] to advance to the next screen. ≥Refer to the guidance on the bottom of the screen. Set the following; ≥Country (USA/Canada) Which country is your DVD Recorder located in? USA Canada ≥ZIP (Postal) code Please enter the 5-digit ZIP code where your DVD Recorder is located: = = = = = ≥Cable service connected to this unit (Yes/No) Do you have cable service connected to this DVD Recorder? Yes No When "No" is selected ➡ right, "The set contents are displayed together" ≥Cable TV box connected to this unit (Yes/No) Is a cable box connected to this DVD Recorder? Yes No When "No" is selected ➡ right, "The set contents are displayed together" If you do not want to use the TV Guide On ScreenTM system Select "No" at this point even if a cable TV box is connected. If you are using a cable TV box, set the following: ≥Cable TV box connection channel (Ch2/Ch3/Ch4/L3) -If you are connecting the cable TV box to this unit's IN3 (L3) terminal, select "L3". -If you are connecting the cable TV box to this unit's RF terminal, select "Ch2", "Ch3" or "Ch4", according to the cable TV box setting. ≥Cable TV box brand (Move down with [4] for more brands. Select "Not Listed" if you cannot find your cable TV box on the list.) ≥IR signal code Make sure your cable TV box is set to the channel that appears on screen and press [ENTER]. Follow steps A and B below: A. Please tune your cable box to channel 02 B. Make sure to leave your cable box turned ON
-
 1
1 -
2
-
3
-
4
-
5
-
6
-
 7
7 -
 8
8 -
 9
9 -
 10
10 -
 11
11 -
 12
12 -
 13
13 -
 14
14 -
 15
15 -
 16
16 -
 17
17 -
18
-
19
-
20
-
21
-
22
-
23
-
24
-
25
-
26
-
27
-
28
-
29
-
30
-
31
-
32
-
33
-
34
-
35
-
36
-
37
-
38
-
39
-
40
-
41
-
42
-
43
-
44
-
45
-
46
-
47
-
48
-
49
-
50
-
51
-
52
-
53
-
54
-
55
-
56
-
57
-
58
-
59
-
60
-
61
-
62
-
63
-
64
-
65
-
66
-
67
-
68
-
69
-
70
-
71
-
72
-
73
-
74
-
75
-
76
-
77
-
78
-
79
-
80
-
81
-
82
-
83
-
84
 |
 |
