Panasonic DMREA18 Dvd Recorder - Multi Language - Page 22
Recording from a DV Camcorder, Turn ON the DV equipment and, pause play where you want
 |
View all Panasonic DMREA18 manuals
Add to My Manuals
Save this manual to your list of manuals |
Page 22 highlights
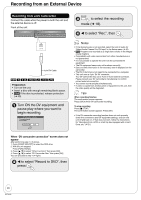
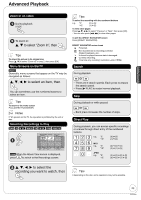
Recording from an External Device Recording from a DV Camcorder Connect the cable while the power to both the unit and the external device is off. Front of the unit to select the recording mode (➔ 18). w to select "Rec.", then DV IN 4-pin DV Cable RAM -R -R DL -RW(V) +R +R DL +RW Preparation: • Turn on the unit. • Insert a disc with enough remaining blank space. • RAM If the disc is protected, release protection (➔ 40). Turn ON the DV equipment and pause play where you want to begin recording. DV camcorder connection DV connection detected. Start recording ? Record to DVD OK Cancel Notes • If the desired audio is not recorded, select the kind of audio for "Select Audio Channel For DV Input" in the Setup menu (➔ 46). • RAM Programs are recorded as a single item; breaks in the images create chapters. • Compatibility with video camcorders from other manufacturers is not guaranteed. • It is not possible to operate the unit from the connected DV equipment. • The DV equipment name may not be shown correctly. • Date and time information is not recorded, even if displayed on the camcorder. • The DV IN terminal is not meant to be connected to a computer. • This unit uses a 4-pin "DV IN" connector; Your DV camcorder may use a 4-pin or 6-pin external connector. Please consult your DV camcorder's manufacturer to confirm correct external connection. • You cannot record and play simultaneously. • If video is copied from another piece of equipment to this unit, then the video quality will be degraded. Tips When recording finishes The confirmation screen appears. Press [OK] to finish DV camcorder recording. To stop recording Press [ g STOP]. The confirmation screen appears. Press [OK]. • If the DV camcorder recording function does not work properly, check the connections and DV equipment settings, and turn the unit off and back on. If that does not work, follow the instructions for "Recording from a VCR or a Set top box equipped with a Hard Drive, etc." (➔ 21). When "DV camcorder connection" screen does not appear After performing step 1 (➔ above). 1. Press [DRIVE SELECT] to select the DVD drive. 2. With the unit stopped Press [FUNCTIONS]. 3. Press [e, r] to select "Other Functions" then press [OK]. 4. Press [e, r] to select "DV Camcorder Rec." then press [OK]. You can proceed to step 4 (➔ right). w to select "Record to DVD", then press 22 RQT9048
-
 1
1 -
2
-
3
-
4
-
5
-
6
-
7
-
8
-
9
-
10
-
11
-
12
-
13
-
14
-
15
-
16
-
 17
17 -
 18
18 -
 19
19 -
 20
20 -
 21
21 -
 22
22 -
 23
23 -
 24
24 -
 25
25 -
 26
26 -
 27
27 -
28
-
29
-
30
-
31
-
32
-
33
-
34
-
35
-
36
-
37
-
38
-
39
-
40
-
41
-
42
-
43
-
44
-
45
-
46
-
47
-
48
-
49
-
50
-
51
-
52
-
53
-
54
-
55
-
56
-
57
-
58
-
59
-
60
-
61
-
62
-
63
-
64
-
65
-
66
-
67
-
68
-
69
-
70
-
71
-
72
-
73
-
74
-
75
-
76
 |
 |
