Panasonic DVD-LX9 Portable Dvd Player - Page 15
Picture Mode, Normal
 |
UPC - 037988250561
View all Panasonic DVD-LX9 manuals
Add to My Manuals
Save this manual to your list of manuals |
Page 15 highlights
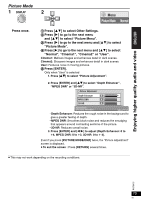
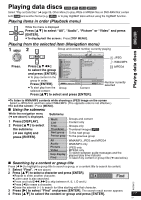
Enjoying higher quality audio and video Picture Mode 1 DISPLAY Press once. 2 ENTER Menu Picture Mode Normal 1 Press [34] to select Other Settings. 2 Press [1] to go to the next menu and [34] to select "Picture Menu". 3 Press [1] to go to the next menu and [34] to select "Picture Mode". 4 Press [1] to go to the next menu and [34] to select "Normal", "Cinema1", "Cinema2" or "User". Cinema1: Mellows images and enhances detail in dark scenes. Cinema2: Sharpens images and enhances detail in dark scenes. User: Reduces noise in moving pictures. 5 Press [ENTER]. Only when "User" is selected 1. Press [34] to select "Picture Adjustment". 2. Press [ENTER] and [34] to select "Depth Enhancer", "MPEG DNR" or "3D-NR". Picture Adjustment Depth Enhancer 0 MDePpEthGEDnhNaRncer 0 3D-NR 0 Depth Enhancer to select to adjust RETURN to exit -Depth Enhancer: Reduces the rough noise in the background to give a greater feeling of depth. -MPEG DNR: Smoothes block noise and reduces the smudging that appears around contrasting sections of the picture. -3D-NR: Reduces overall noise. 3. Press [ENTER] and [2 1] to adjust (Depth Enhancer: 0 to r4, MPEG DNR: 0 to r3, 3D-NR: 0 to r 4). Even if you press [PICTURE MODE/DNR] twice, the "Picture Adjustment" screen is displayed. ≥ To exit the screen : Press [RETURN] several times. ≥ This may not work depending on the recording conditions. RQT8075 15 15
-
 1
1 -
2
-
3
-
4
-
5
-
6
-
7
-
8
-
9
-
 10
10 -
 11
11 -
 12
12 -
 13
13 -
 14
14 -
 15
15 -
 16
16 -
 17
17 -
 18
18 -
 19
19 -
 20
20 -
21
-
22
-
23
-
24
-
25
-
26
-
27
-
28
-
29
-
30
-
31
-
32
-
33
-
34
-
35
-
36
-
37
-
38
-
39
-
40
-
41
-
42
-
43
-
44
-
45
-
46
-
47
-
48
-
49
-
50
-
51
-
52
-
53
-
54
-
55
-
56
-
57
-
58
-
59
-
60
-
61
-
62
-
63
-
64
-
65
-
66
-
67
-
68
-
69
-
70
-
71
-
72
-
73
-
74
-
75
-
76
 |
 |
